Hello everyone! In today’s article we are going to be going over how to install PiHole and Unbound DNS within two Podman containers, on Fedora Linux Server edition! This is an accompanying article to my YouTube video shown above, if like me now (in the past I would’ve said YouTube videos 100% of the time) you prefer the written version of tutorials / content online.
Requirements
To be able to do this you’re going to need a server with Fedora Linux Server Edition on it to host the containers. You could host the containers on other host OS’s as well but the tools available on Fedora make things a lot easier.
You’ll also want to have your Network Interface on your server set to a statically assigned IP, so that it doesn’t change and ruin your internet connectivity for your wife who is at home studying while you’re stuck in a meeting at work. (This example is purely hypothetical)
What is a Container
If you’re totally new to this space then you might be wondering what a container even is? Certainly you’ll be familiar with a normal computer if you’re reading this article. Every laptop, desktop, server, tablet and phone all run something called an Operating System. This operating system is what lets you use the computer. It controls how the GUI (Graphical User Interface) is displayed and what it looks like. There also exists another concept called Virtual Machines. They are basically like Virtual Computers that you can run on something called a Hypervisor on the host computer. That lets you run different operating systems all on the same computer. The downside to these is they’re often slower than running something on “bare-metal” which is another term for a normal computer. Containers are like lightweight virtual machines. They share all the files they need with the host computer’s kernel (the core files a computer needs to run), packaged together with just what files are needed for the one specific application to run. This makes it much easier to run many at once, and improves security, especially when using something like Podman, which runs containers at a similar level of permissions (like a security clearance) as an end user (most of the time.)
Why Podman over Docker?
Docker is definitely the most popular container runtime on the market by a large margin. It’s what popularized the container application concept to a large degree. However Docker as a major flaw (at least this is one of them), is that it runs all the containers as root. This means the docker application that manages the containers has full access to the system (in theory) and therefore so do the containers. Podman removes this as it’s daemonless, and uses Systemd to manage them which is already built into Linux. Another hallmark feature of Podman is that it does not run all the containers as root by default. Instead it runs it at a permission-level of a normal user, increasing security. From an ease of use standpoint, Podman is already conveniently integrated into Fedora Server which makes our deployment super easy!
Prep Work
Go ahead and log into the Cockpit Web Dashboard of your Fedora Server. Server URL: hxxps://192.168.1.150:9090 The main page should look something like this:
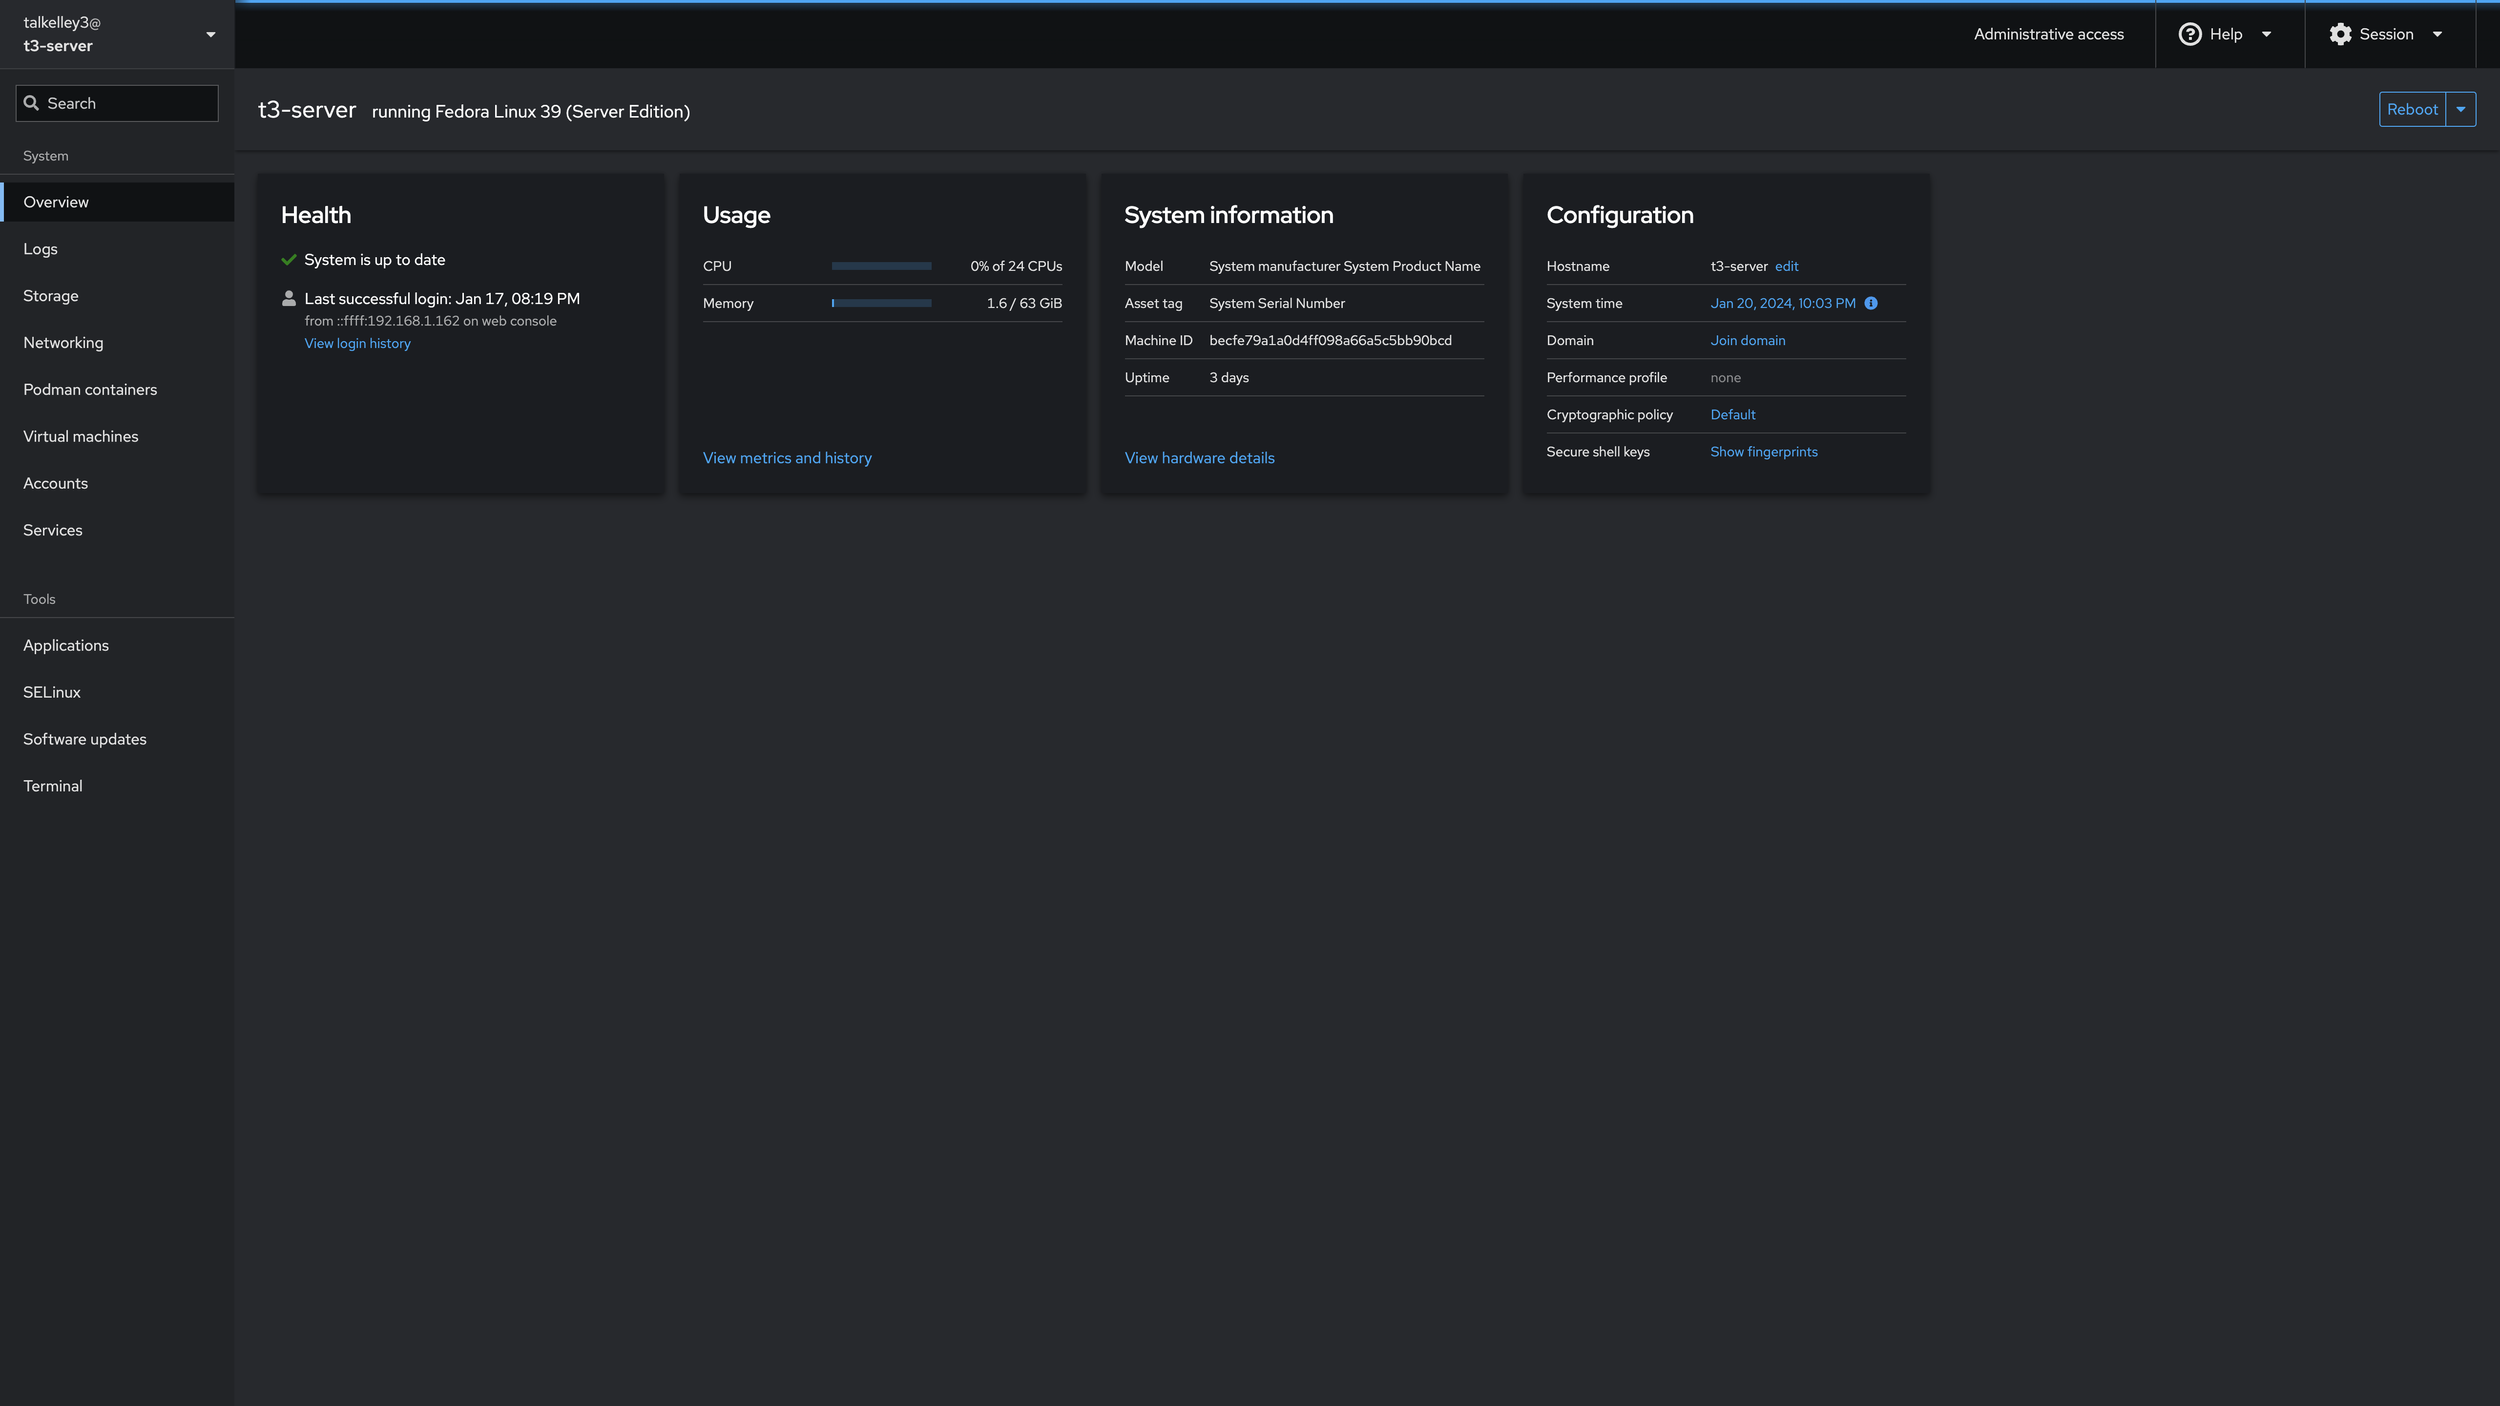
Click on Terminal in the left-side panel, and now we’re in! First we’ll need to create a directory for our volumes and configuration files. We’ll run
mkdir ~/podman
mkdir ~/podman/pihole
mkdir ~/podman/unbound
Podman is the name of our container runtime, while pihole and unbound are the two containers we’re going to run. I’m just making these separately to keep everything organized. PiHole requires two more folders for something called volumes. Containers are temporary, and so PiHole needs a “volume” to be able to store it’s configuration files, blocklists, etc. when performing upgrades or sudden reboots. We’ll create these with the command:
mkdir ~/podman/pihole/etc-pihole
mkdir ~/podman/pihole/etc-dnsmasq.d
Now click on “Podman Containers”. If this doesn’t exist then open “Applications” and search for Podman to install it. We’ll click “Create Container” and start inputting our values.
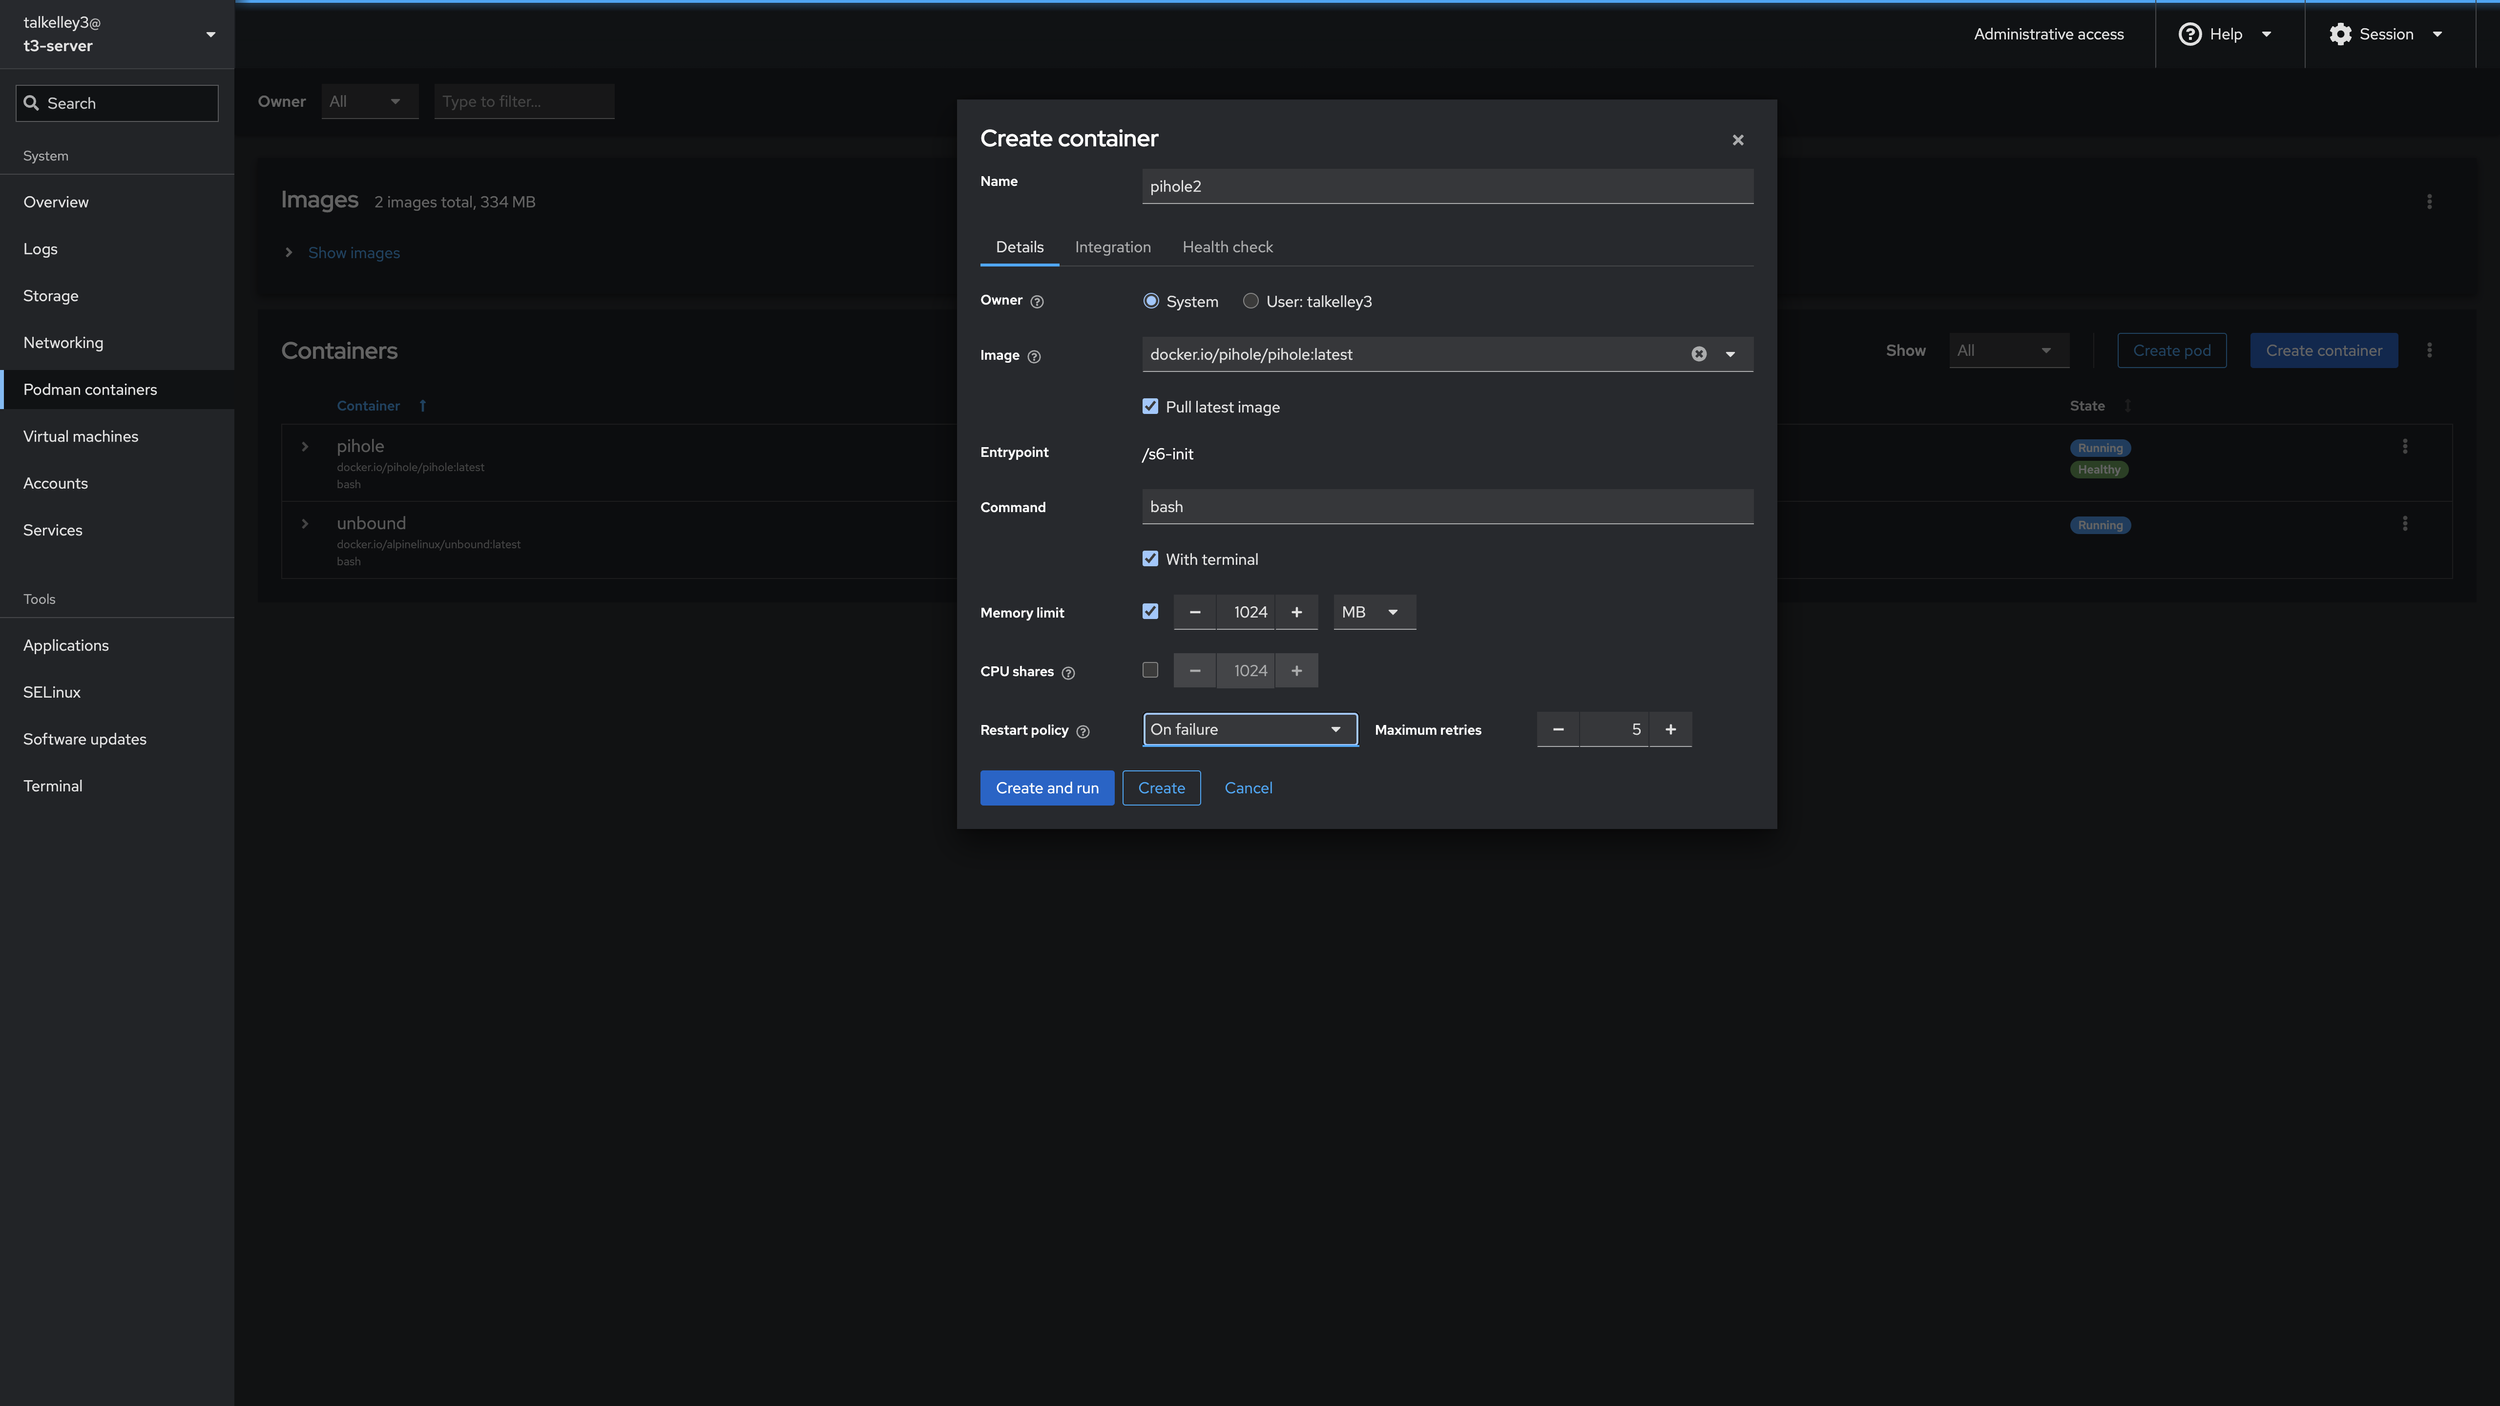
I like to name my containers what they are, since I’m not running a fleet of containers, or any duplicates of the services that I have. So we’ll put in the name pihole
The Owner is System, and for Image we’ll search for “pihole” and choose the latest docker.io/pihole/pihole-latest image. In Command we’ll put “bash”, check With terminal and change the Memory Limit to 1024 MB. Restart Policy we’ll set to “On failure.” And now we’re done with this page! Click Integration and we’ll fill out the next page.
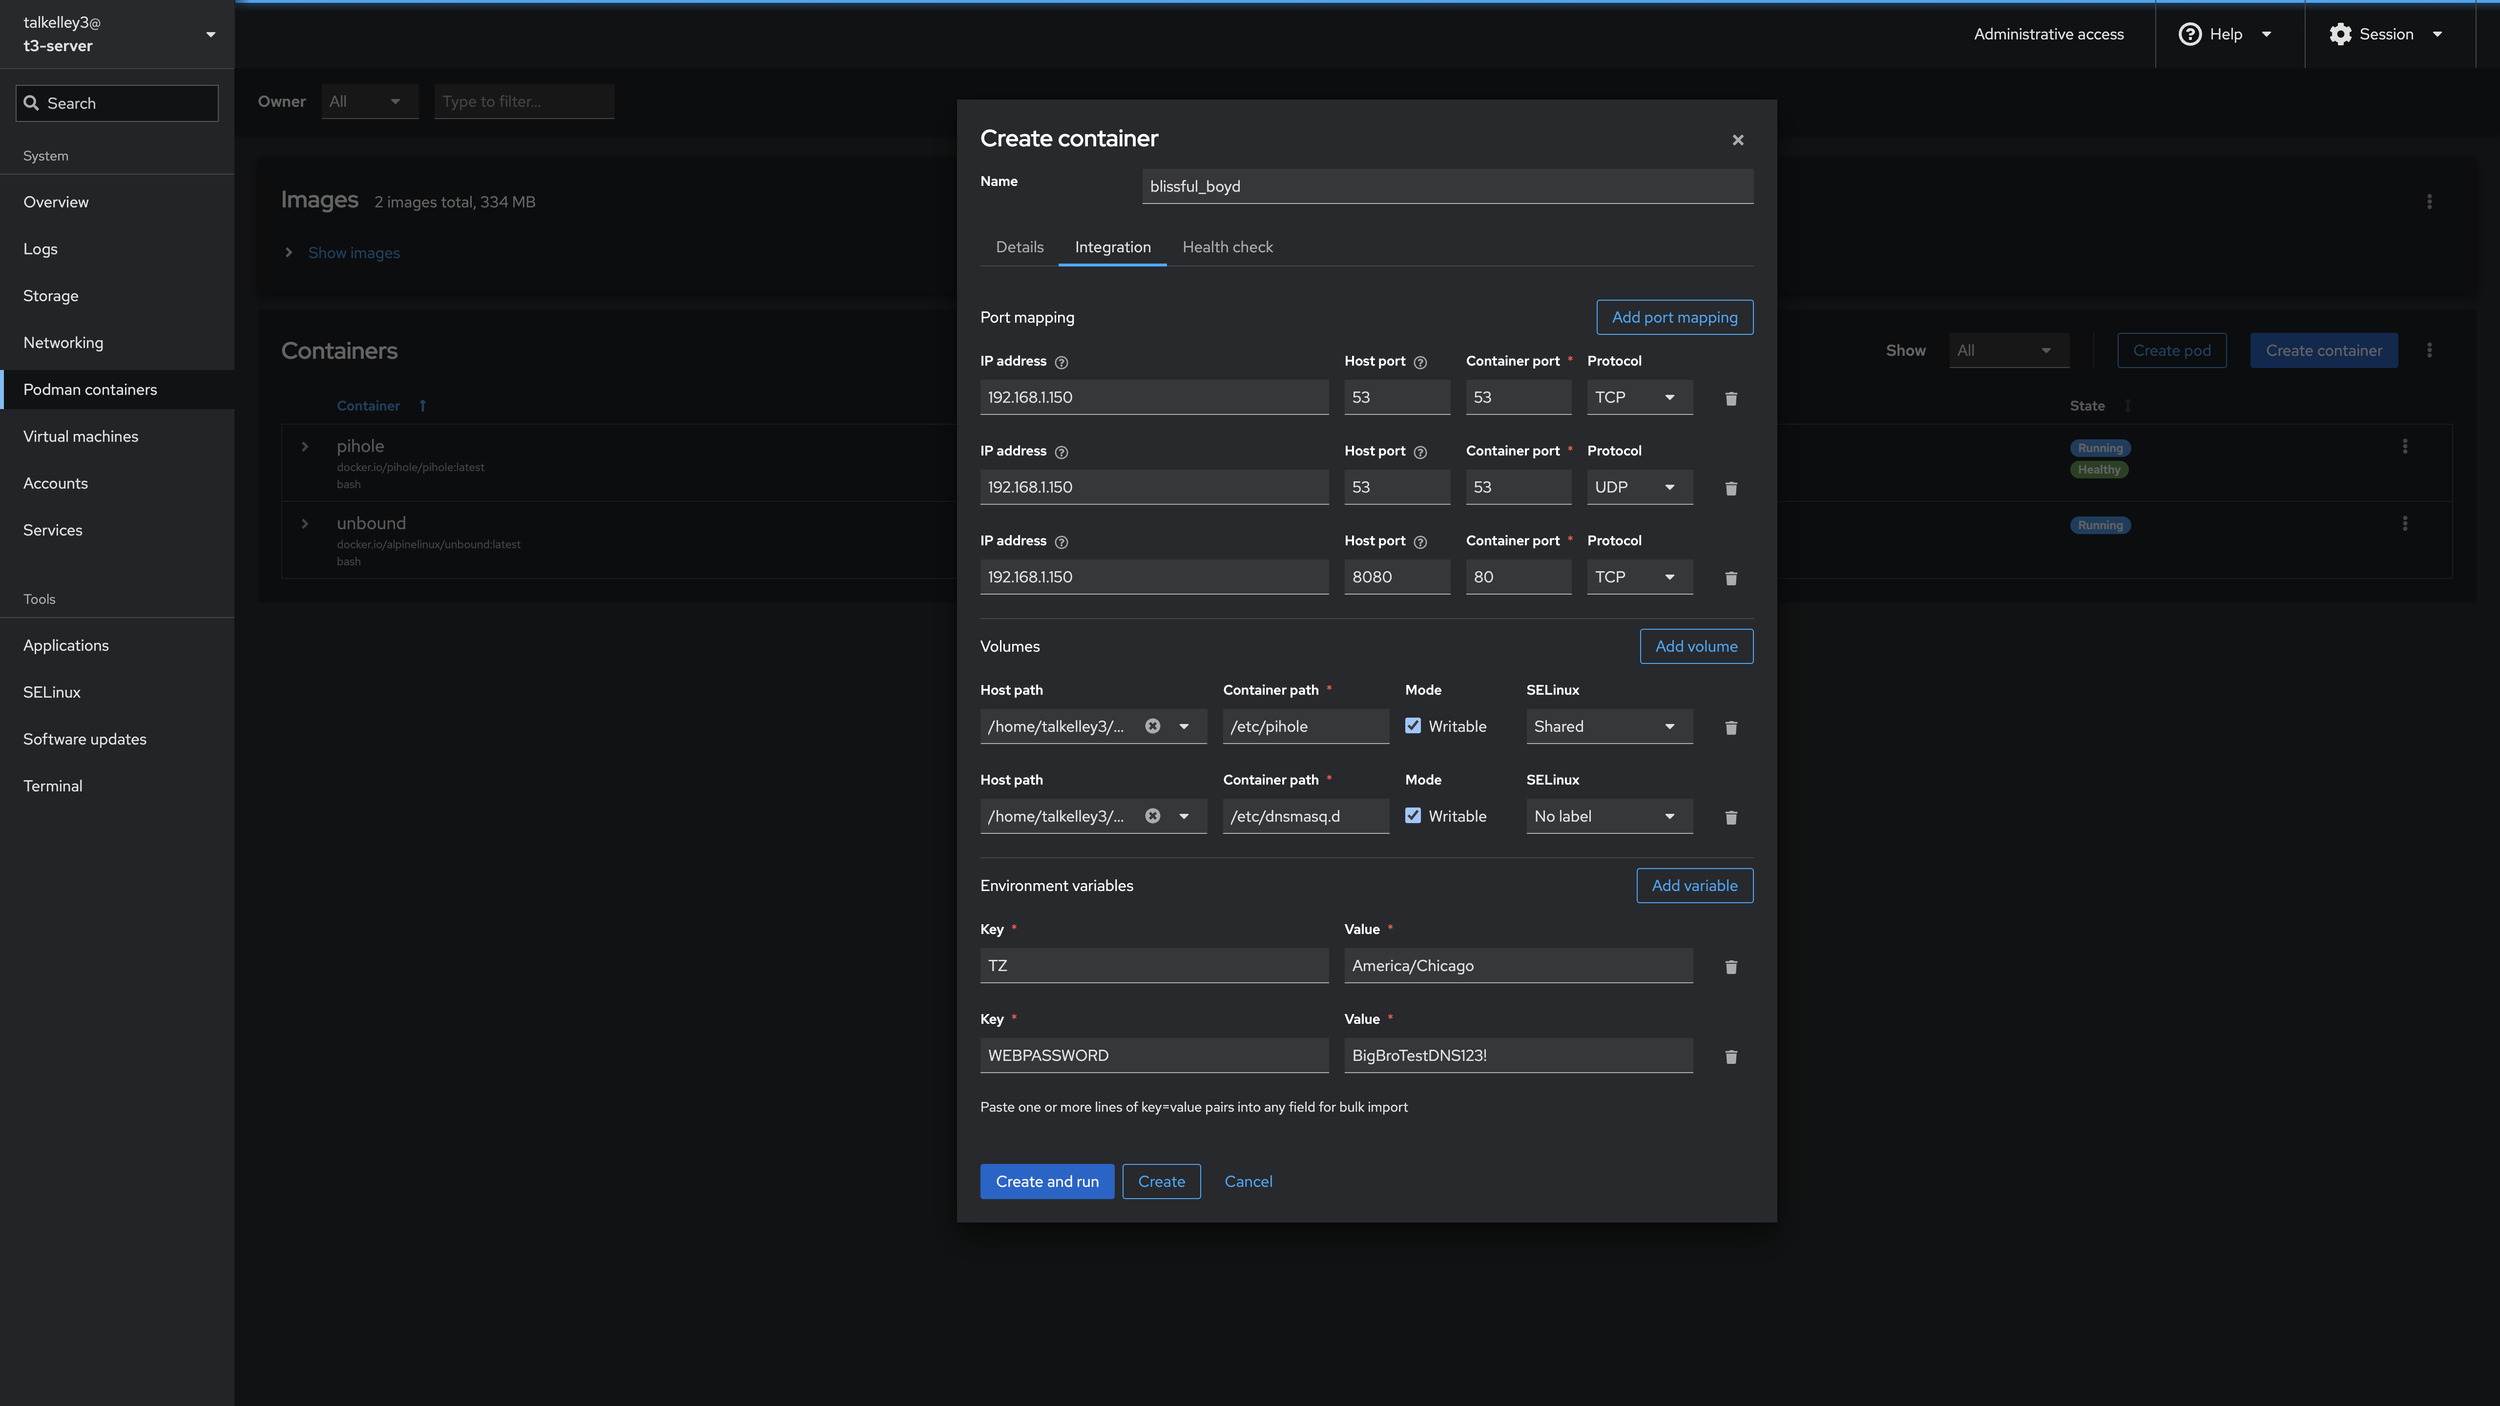
We want to map these ports from the internal container network, to our host so that other devices on our home network can see them. We’ll configure those as
IP ADDRESS: 192.168.1.150
HOST PORT: 53
CONTAINER PORT: 53
PROTOCOL: TCP

IP ADDRESS: 192.168.1.150
HOST PORT: 53
CONTAINER PORT: 53
PROTOCOL: UDP

IP ADDRESS: 192.168.1.150
HOST PORT: 8080
CONTAINER PORT: 80
PROTOCOL: TCP
For volumes we’ll configure PiHole to have access to the folders we created earlier. Host Path maps to the folder we created earlier, while Container Path maps to those same folders location inside the container operating system. Replace my username in your path with yours
HOST PATH: /home/talkelley3/podman/pihole/etc-pihole
CONTAINER PATH: /etc/pihole
MODE: Writeable
SELINUX: Shared

HOST PATH: /home/talkelley3/podman/pihole/etc-dnsmasq.d
CONTAINER PATH: /etc/dnsmasq.d
MODE: Writeable
SELINUX: Shared
PiHole requires two Environment Variables at least to run. They are to set the timezone and the web interface password
KEY: TZ
VALUE: America/Chicago

KEY: WEBPASSWORD
Value: BigBroDNSTest123!
Now you’re ready to click Create! If you’re like me, it probably just failed! RIP. Don’t worry, that’s because of SELinux, a security feature present in a lot of variants of Linux. Navigate to the SELinux menu and click disable. As you can see it will self-enable on next reboot, so be careful! I’d recommend after this video going down the list of alerts and putting in all the exemptions for them. (The UI shows the proper exemption commands once the alert is expanded.)
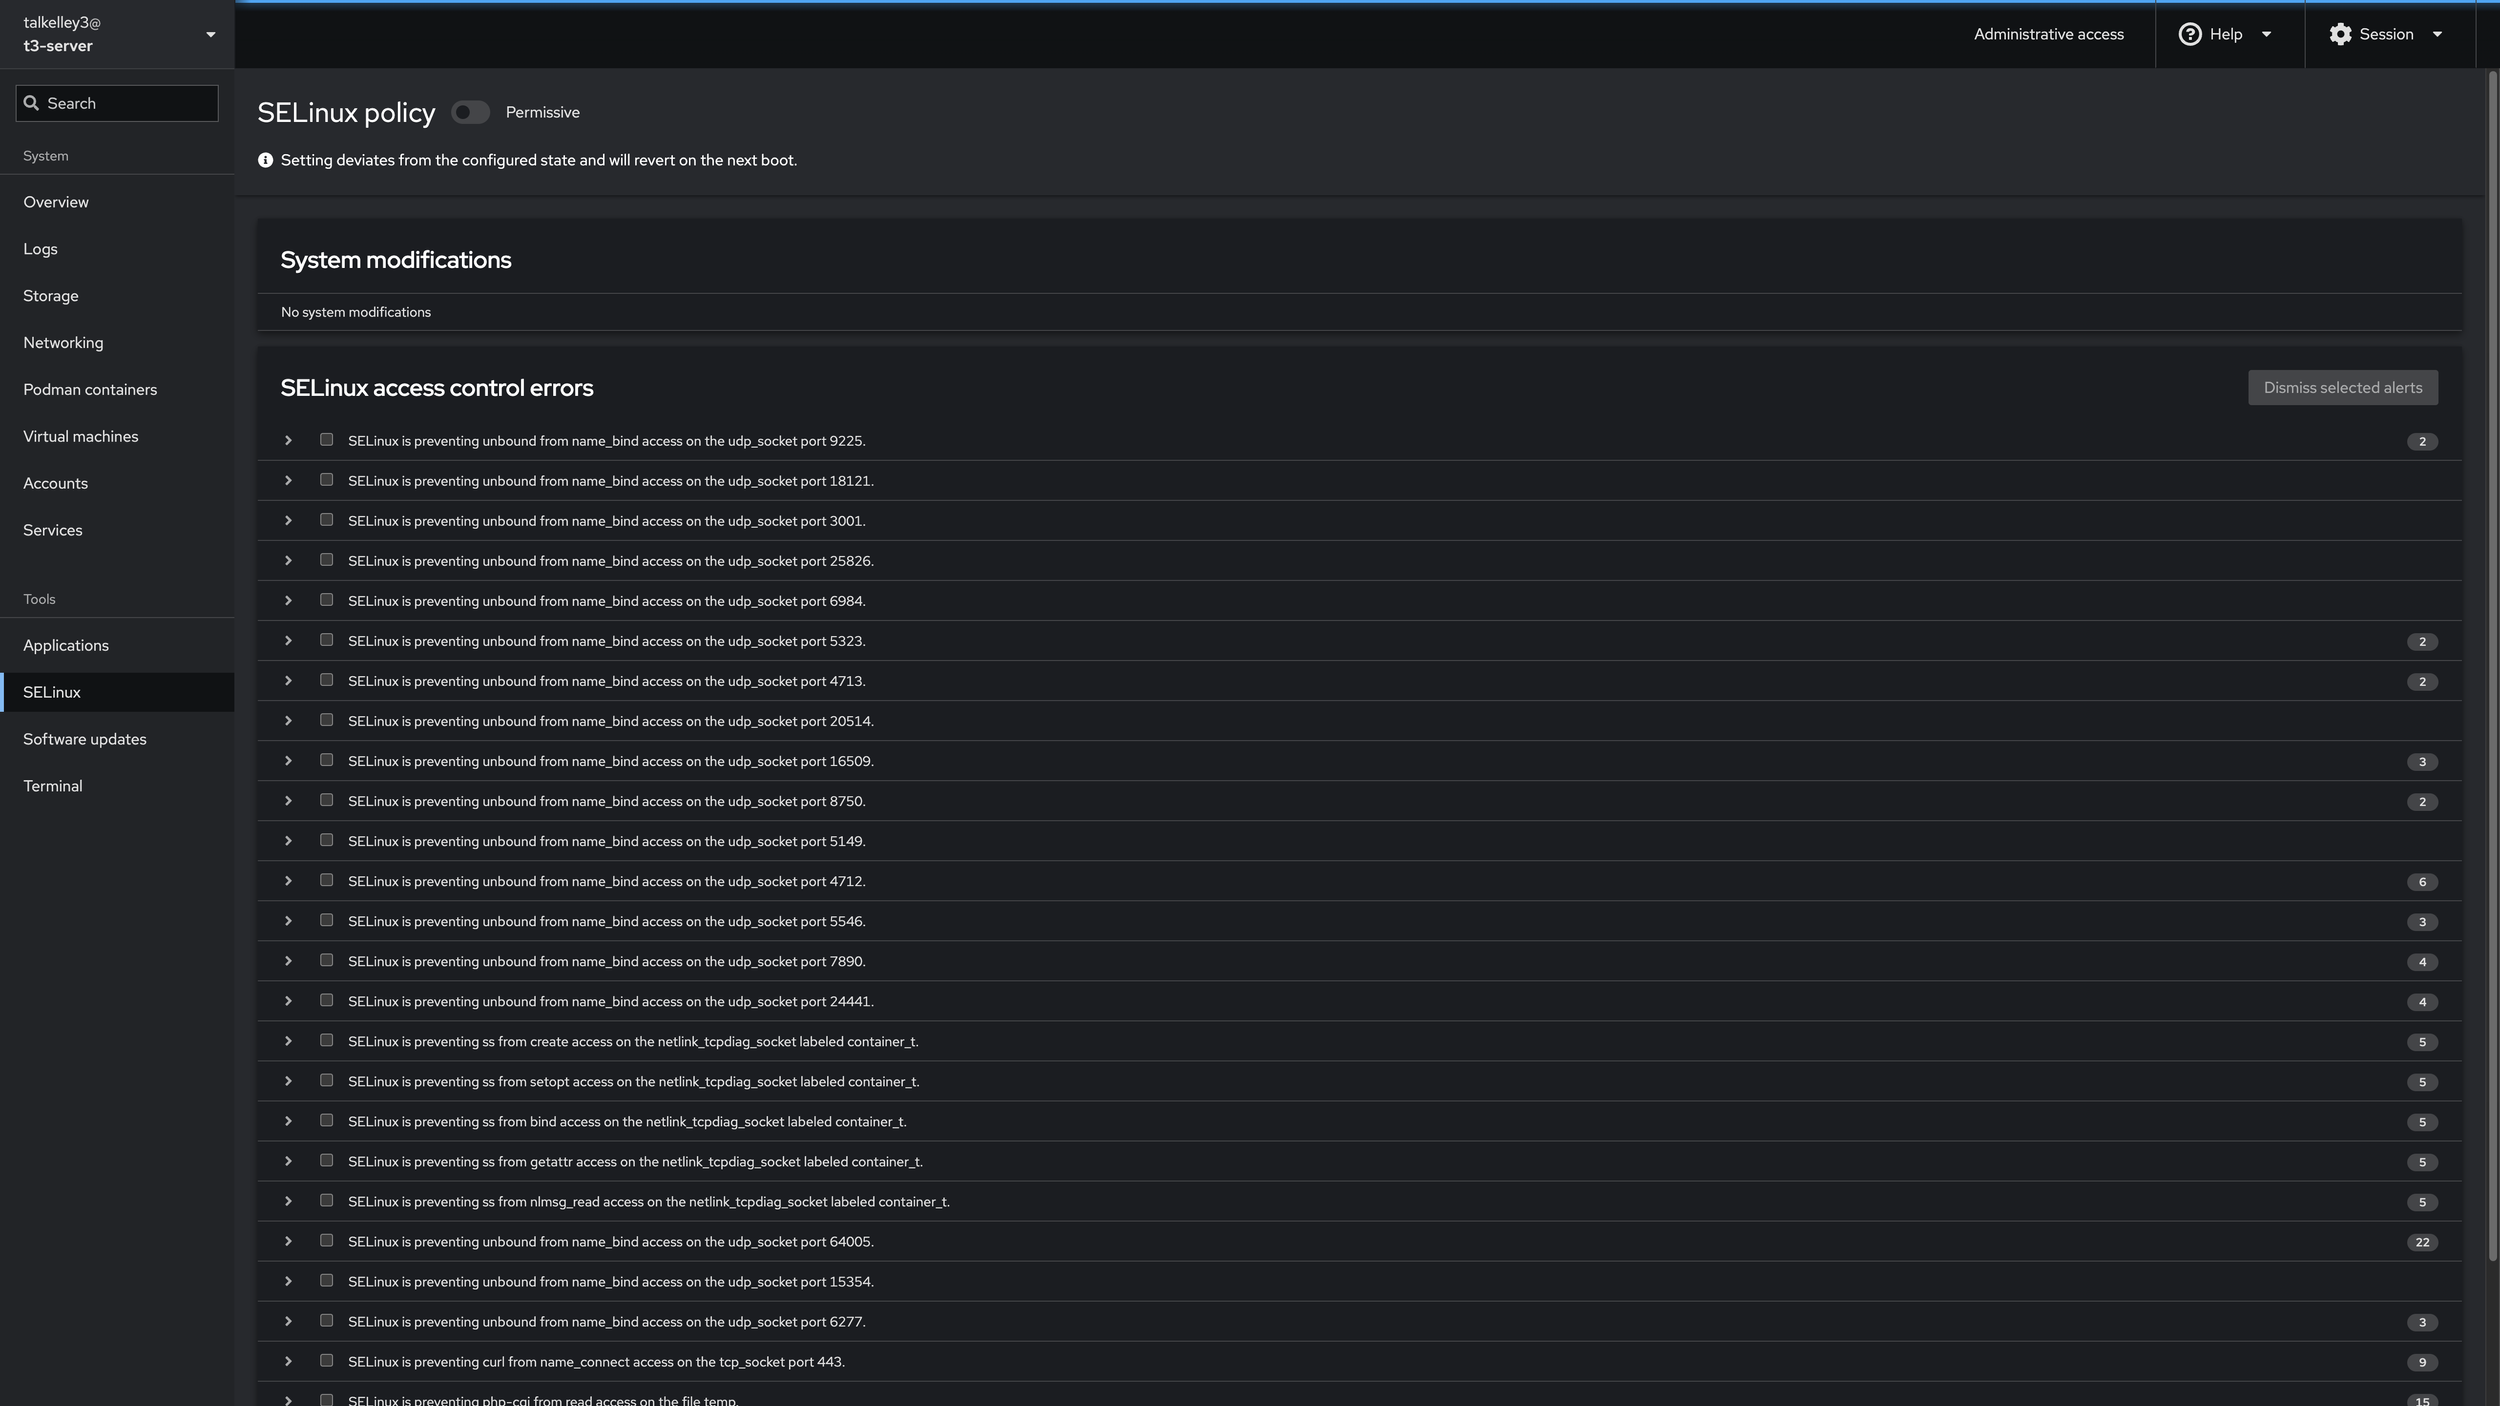
My SE Linux interface has tons of alerts at the moment. I still need to tune them!
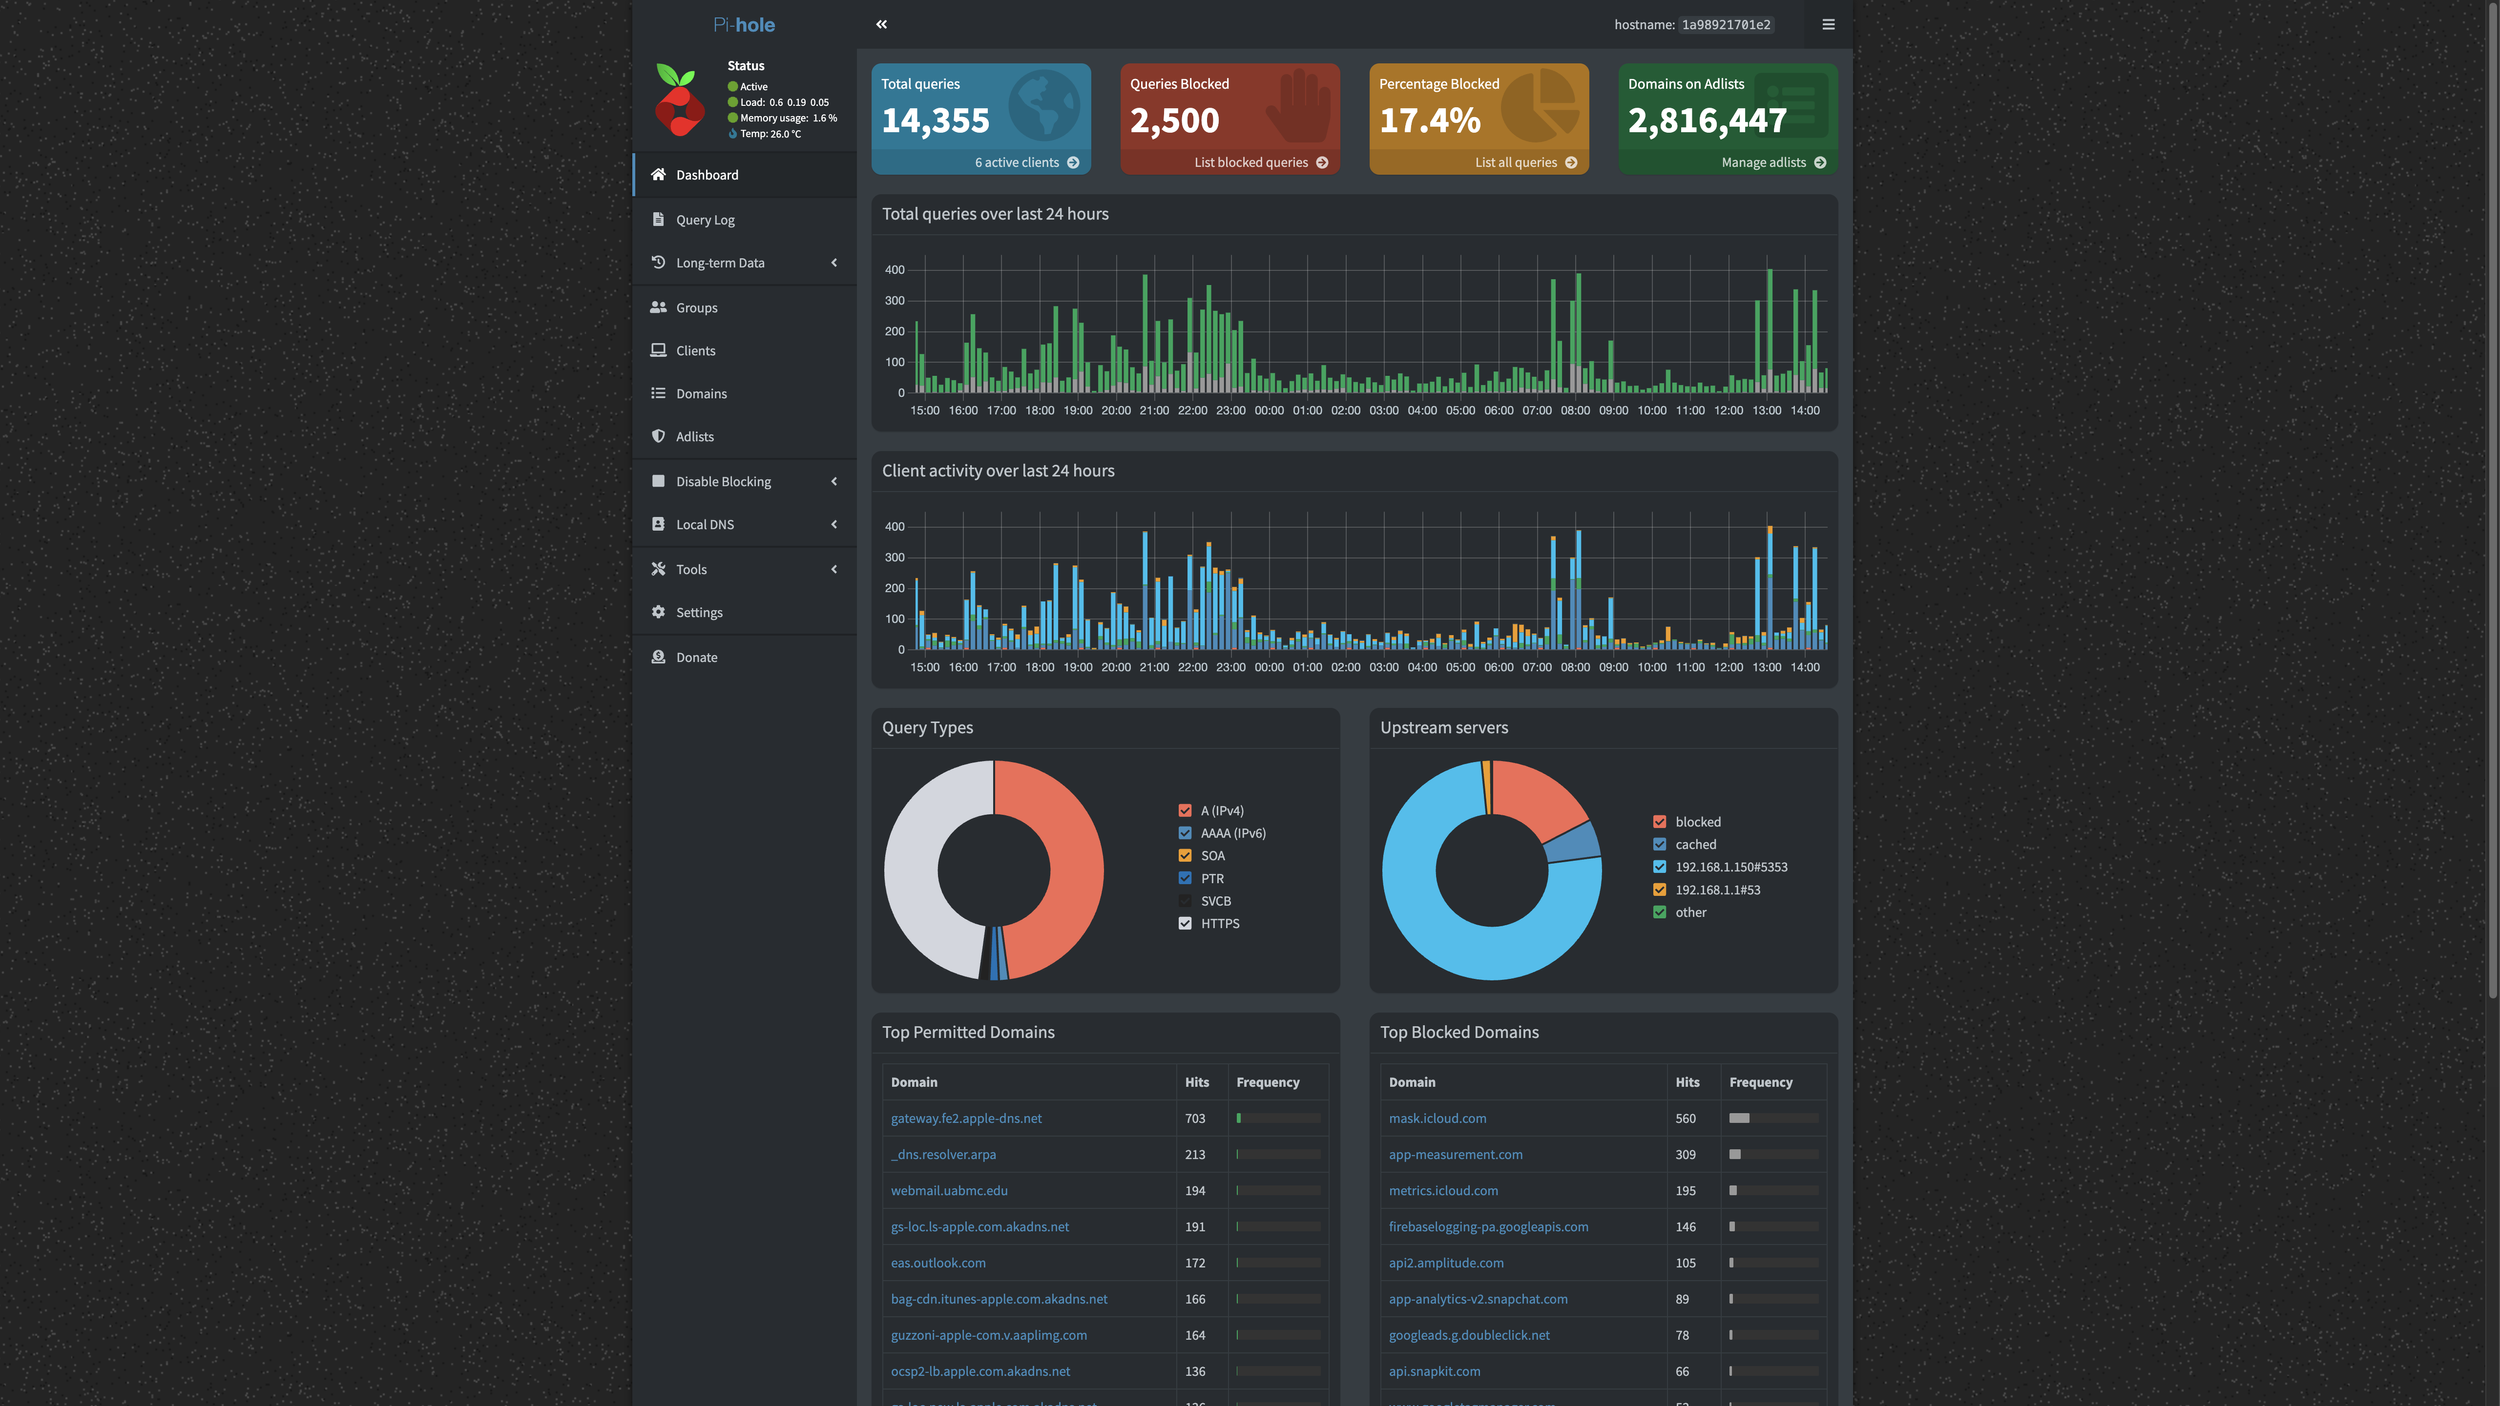
Lets navigate to hxxp://192.168.1.150:8080, and now we’re in! Enter in your password you set earlier and you should be logged into PiHole! It should look something like this, albeit without a ton of blocks and traffic.
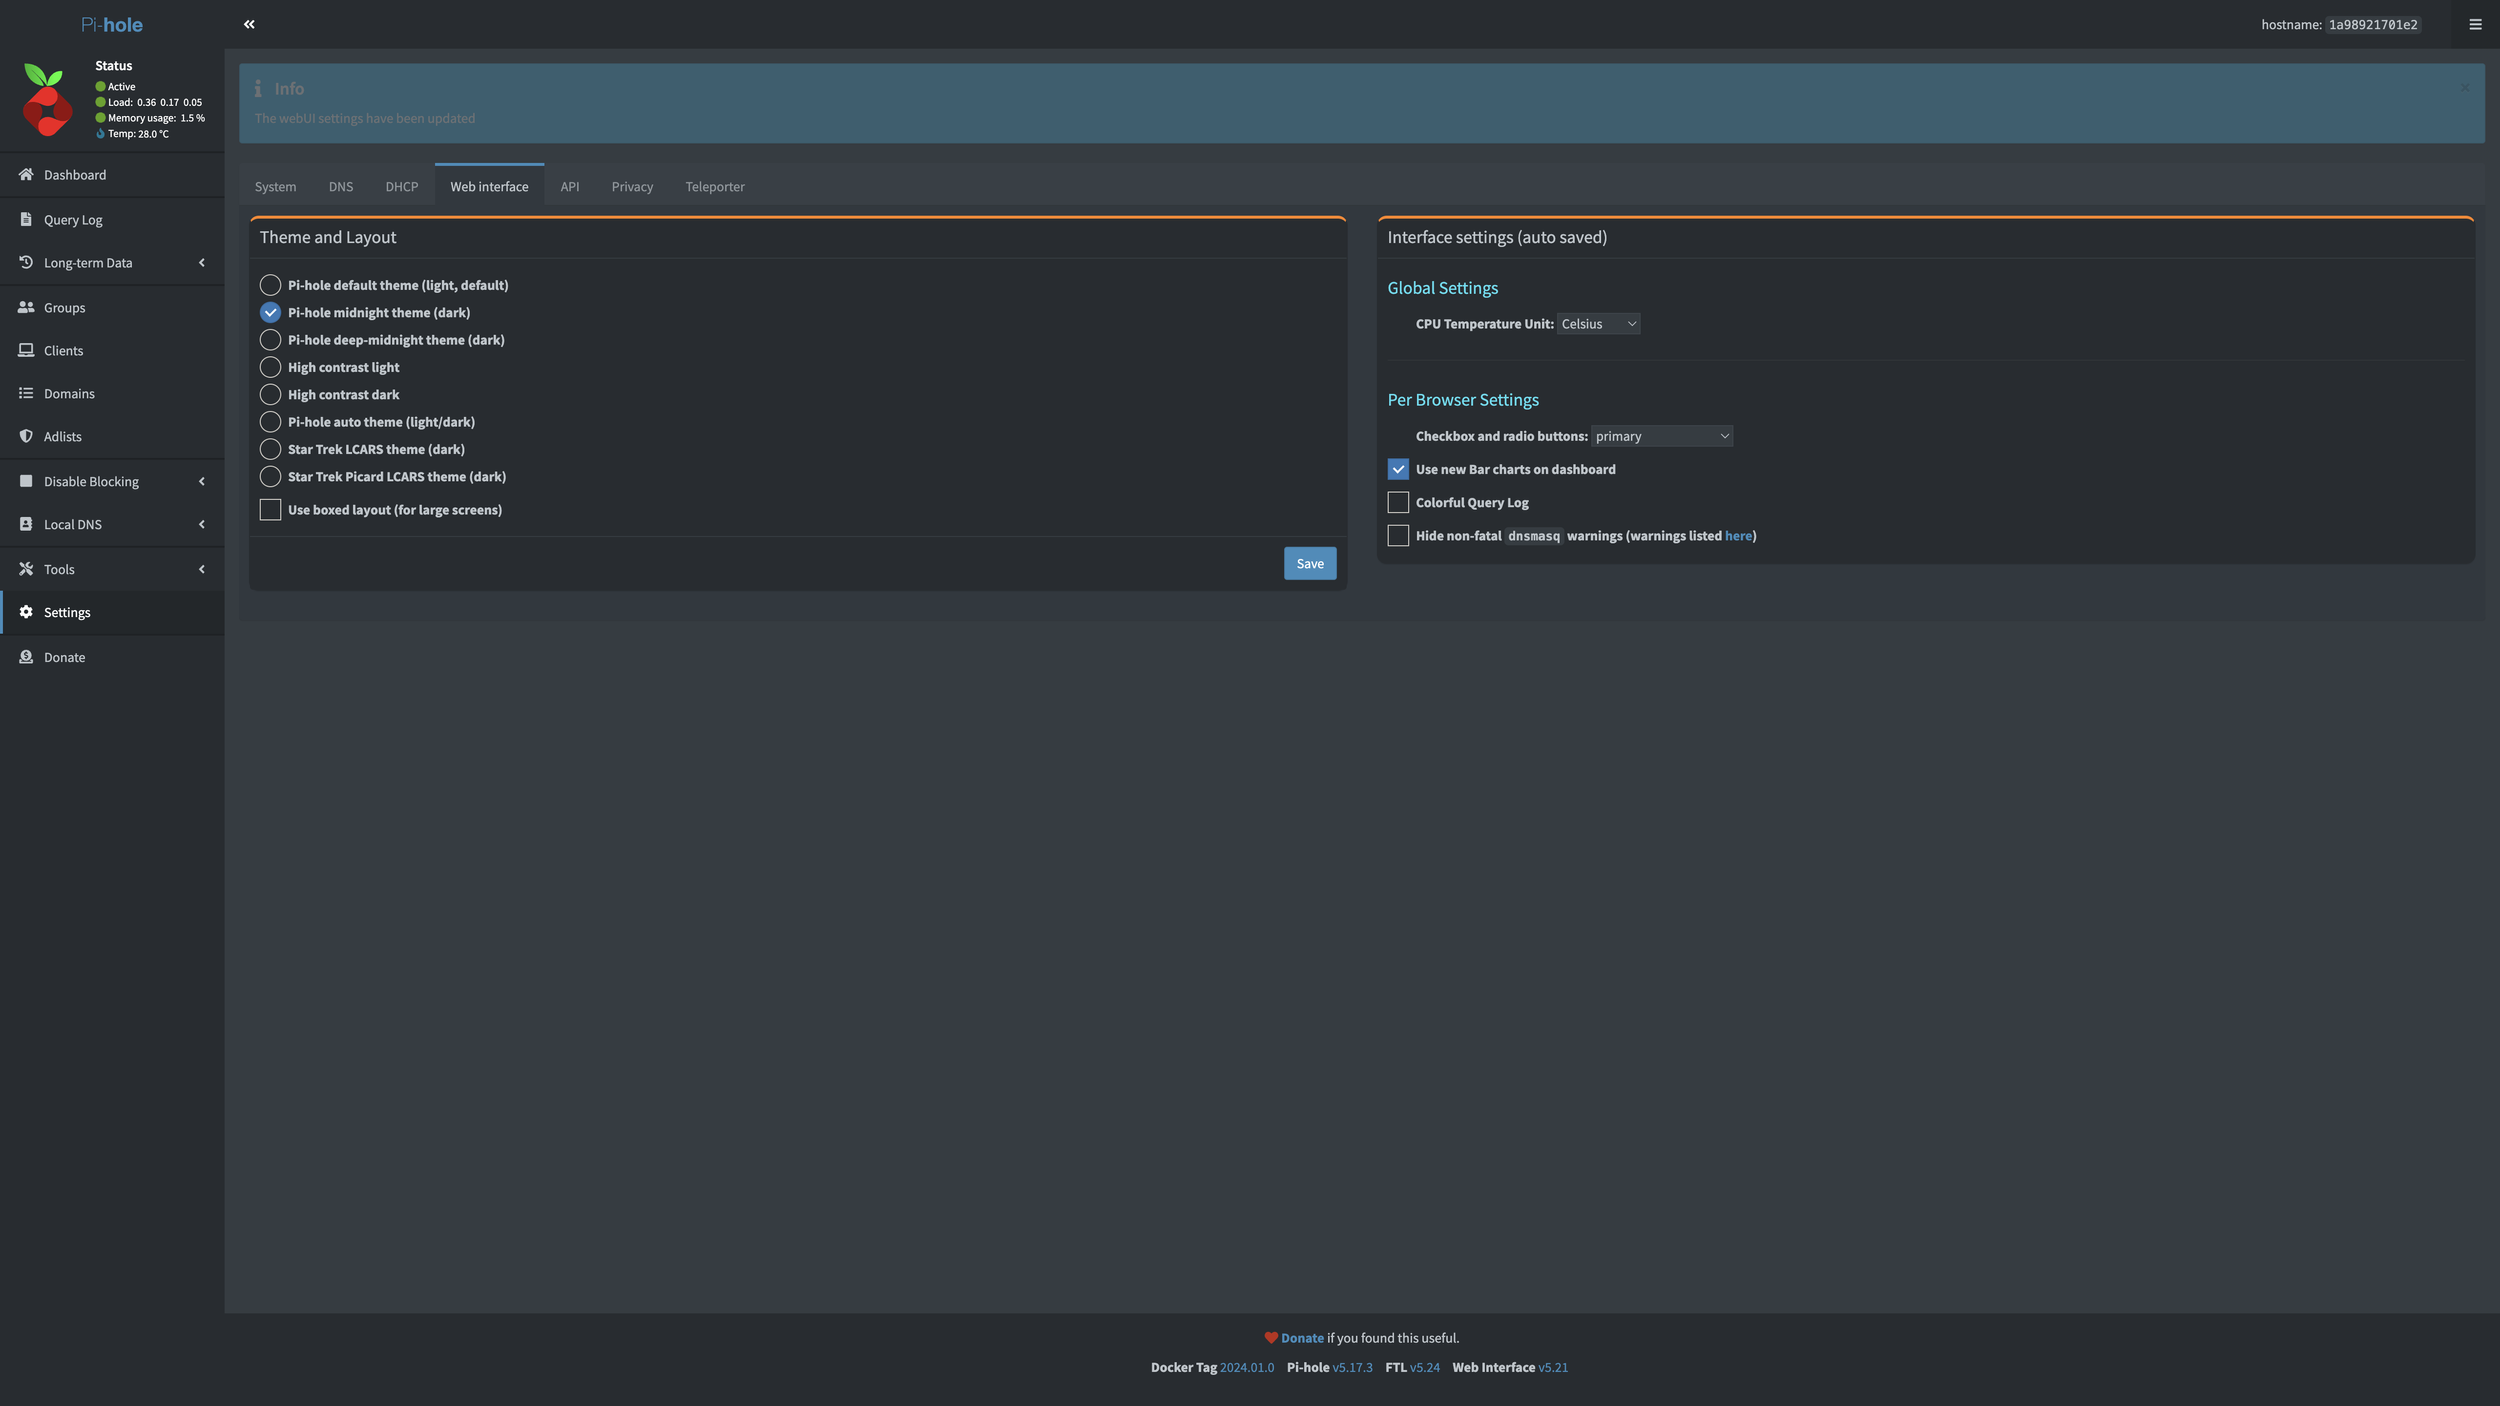
If you navigate to Settings, Web Interface, then you can uncheck Use boxed layout (for large screens) which will make it wide-screen. Changing the theme to Star Trek Picard LCARS theme (dark) looks so much more cool to me personally.
The new interface:
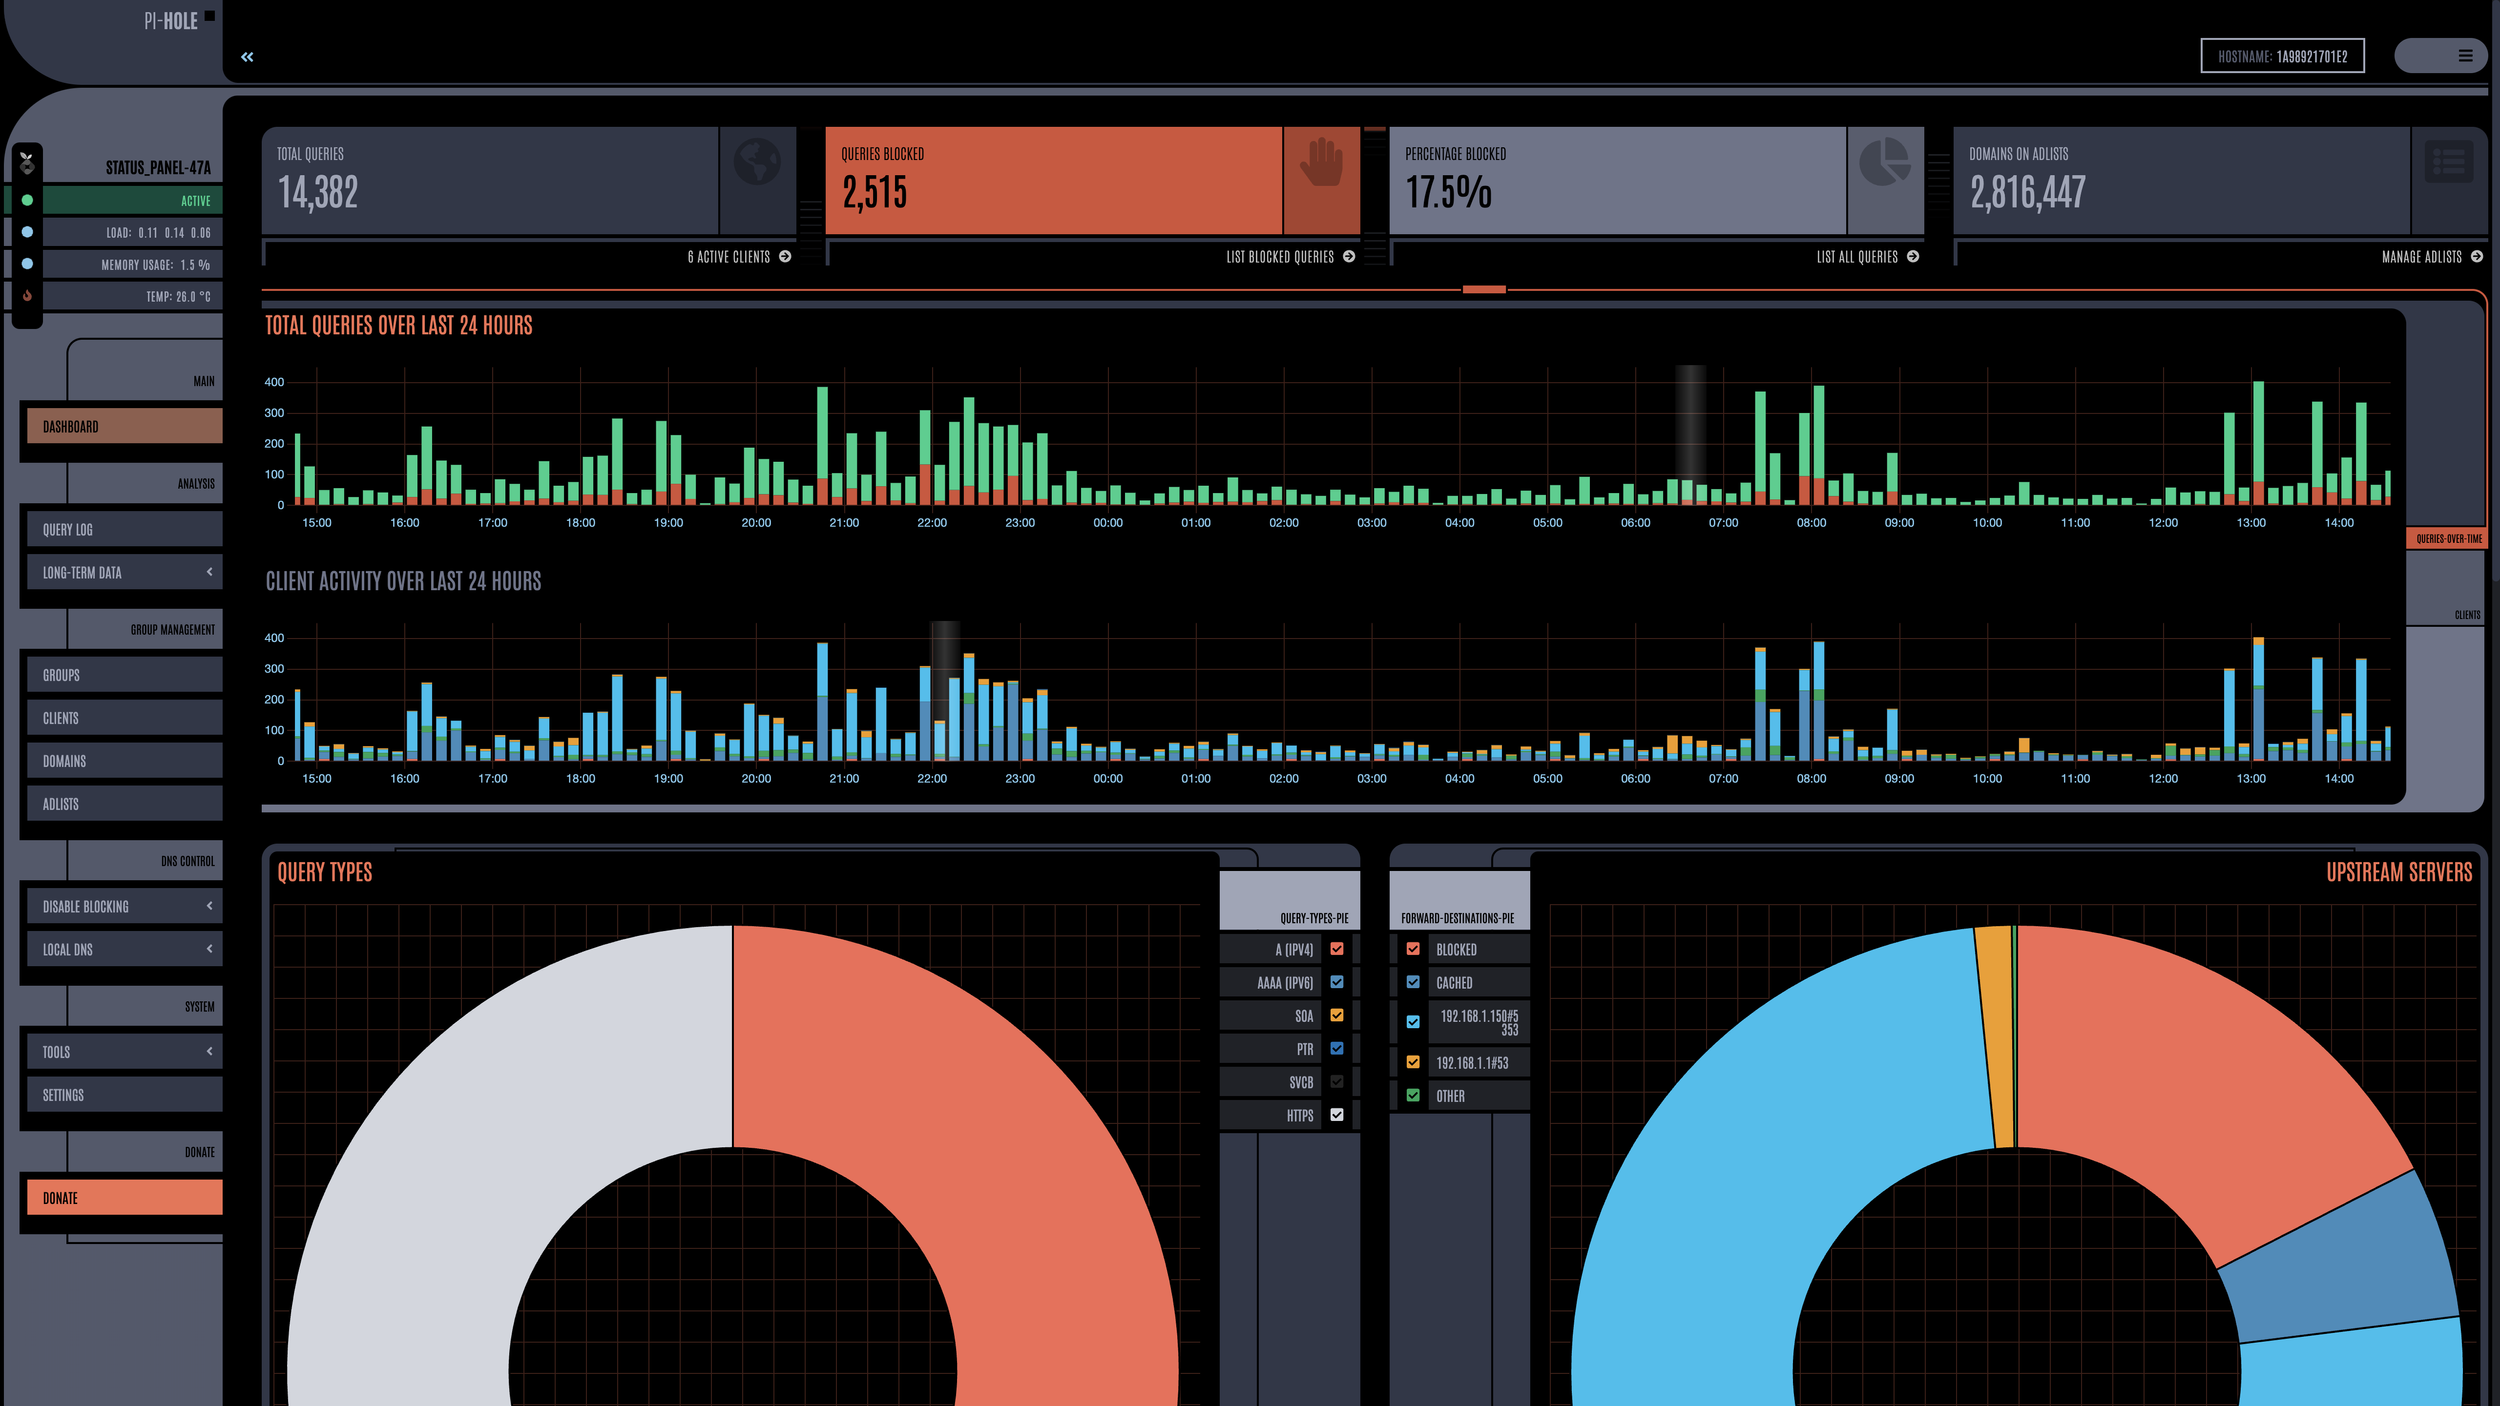
Looks much better right? Now lets jump back into Fedora’s console and install Unbound DNS! Navigate to the Terminal and Change Directory into Unbound’s directory.
cd ~/podman/unbound/Now lets use NeoVim to create a new unbound configuration file. You can use vim, vi, or nano to do this same process.
nvim ./unbound.confFor those who don’t already know “~/” means your user home directory, and “./” means relative from what directory you’re already in. Type “i” to enter insert mode, and paste in the following text.
server:
# If no logfile is specified, syslog is used
# logfile: "/var/log/unbound/unbound.log"
verbosity: 0
interface: 0.0.0.0
port: 5353
do-ip4: yes
do-udp: yes
do-tcp: yes
do-ip6: no
prefer-ip6: no
# Trust glue only if it is within the server's authority
harden-glue: yes
# Require DNSSEC data for trust-anchored zones, if such data is absent, the zone becomes BOGUS
harden-dnssec-stripped: yes
use-caps-for-id: no
# Reduce EDNS reassembly buffer size.
edns-buffer-size: 1232
#Performance settings
prefetch: yes
num-threads: 1
so-rcvbuf: 5m
access-control: 10.0.0.0/8 allow
access-control: 192.168.0.0/16 allow
access-control: 172.16.0.0/12 allow
# Ensure privacy of local IP ranges
private-address: 192.168.0.0/16
private-address: 169.254.0.0/16
private-address: 172.16.0.0/12
private-address: 10.0.0.0/8
private-address: fd00::/8
private-address: fe80::/10
Type ESC, :wq then press enter to to exit! Now navigate back to the to the Podman container management portion of the console and press “Create Container”.
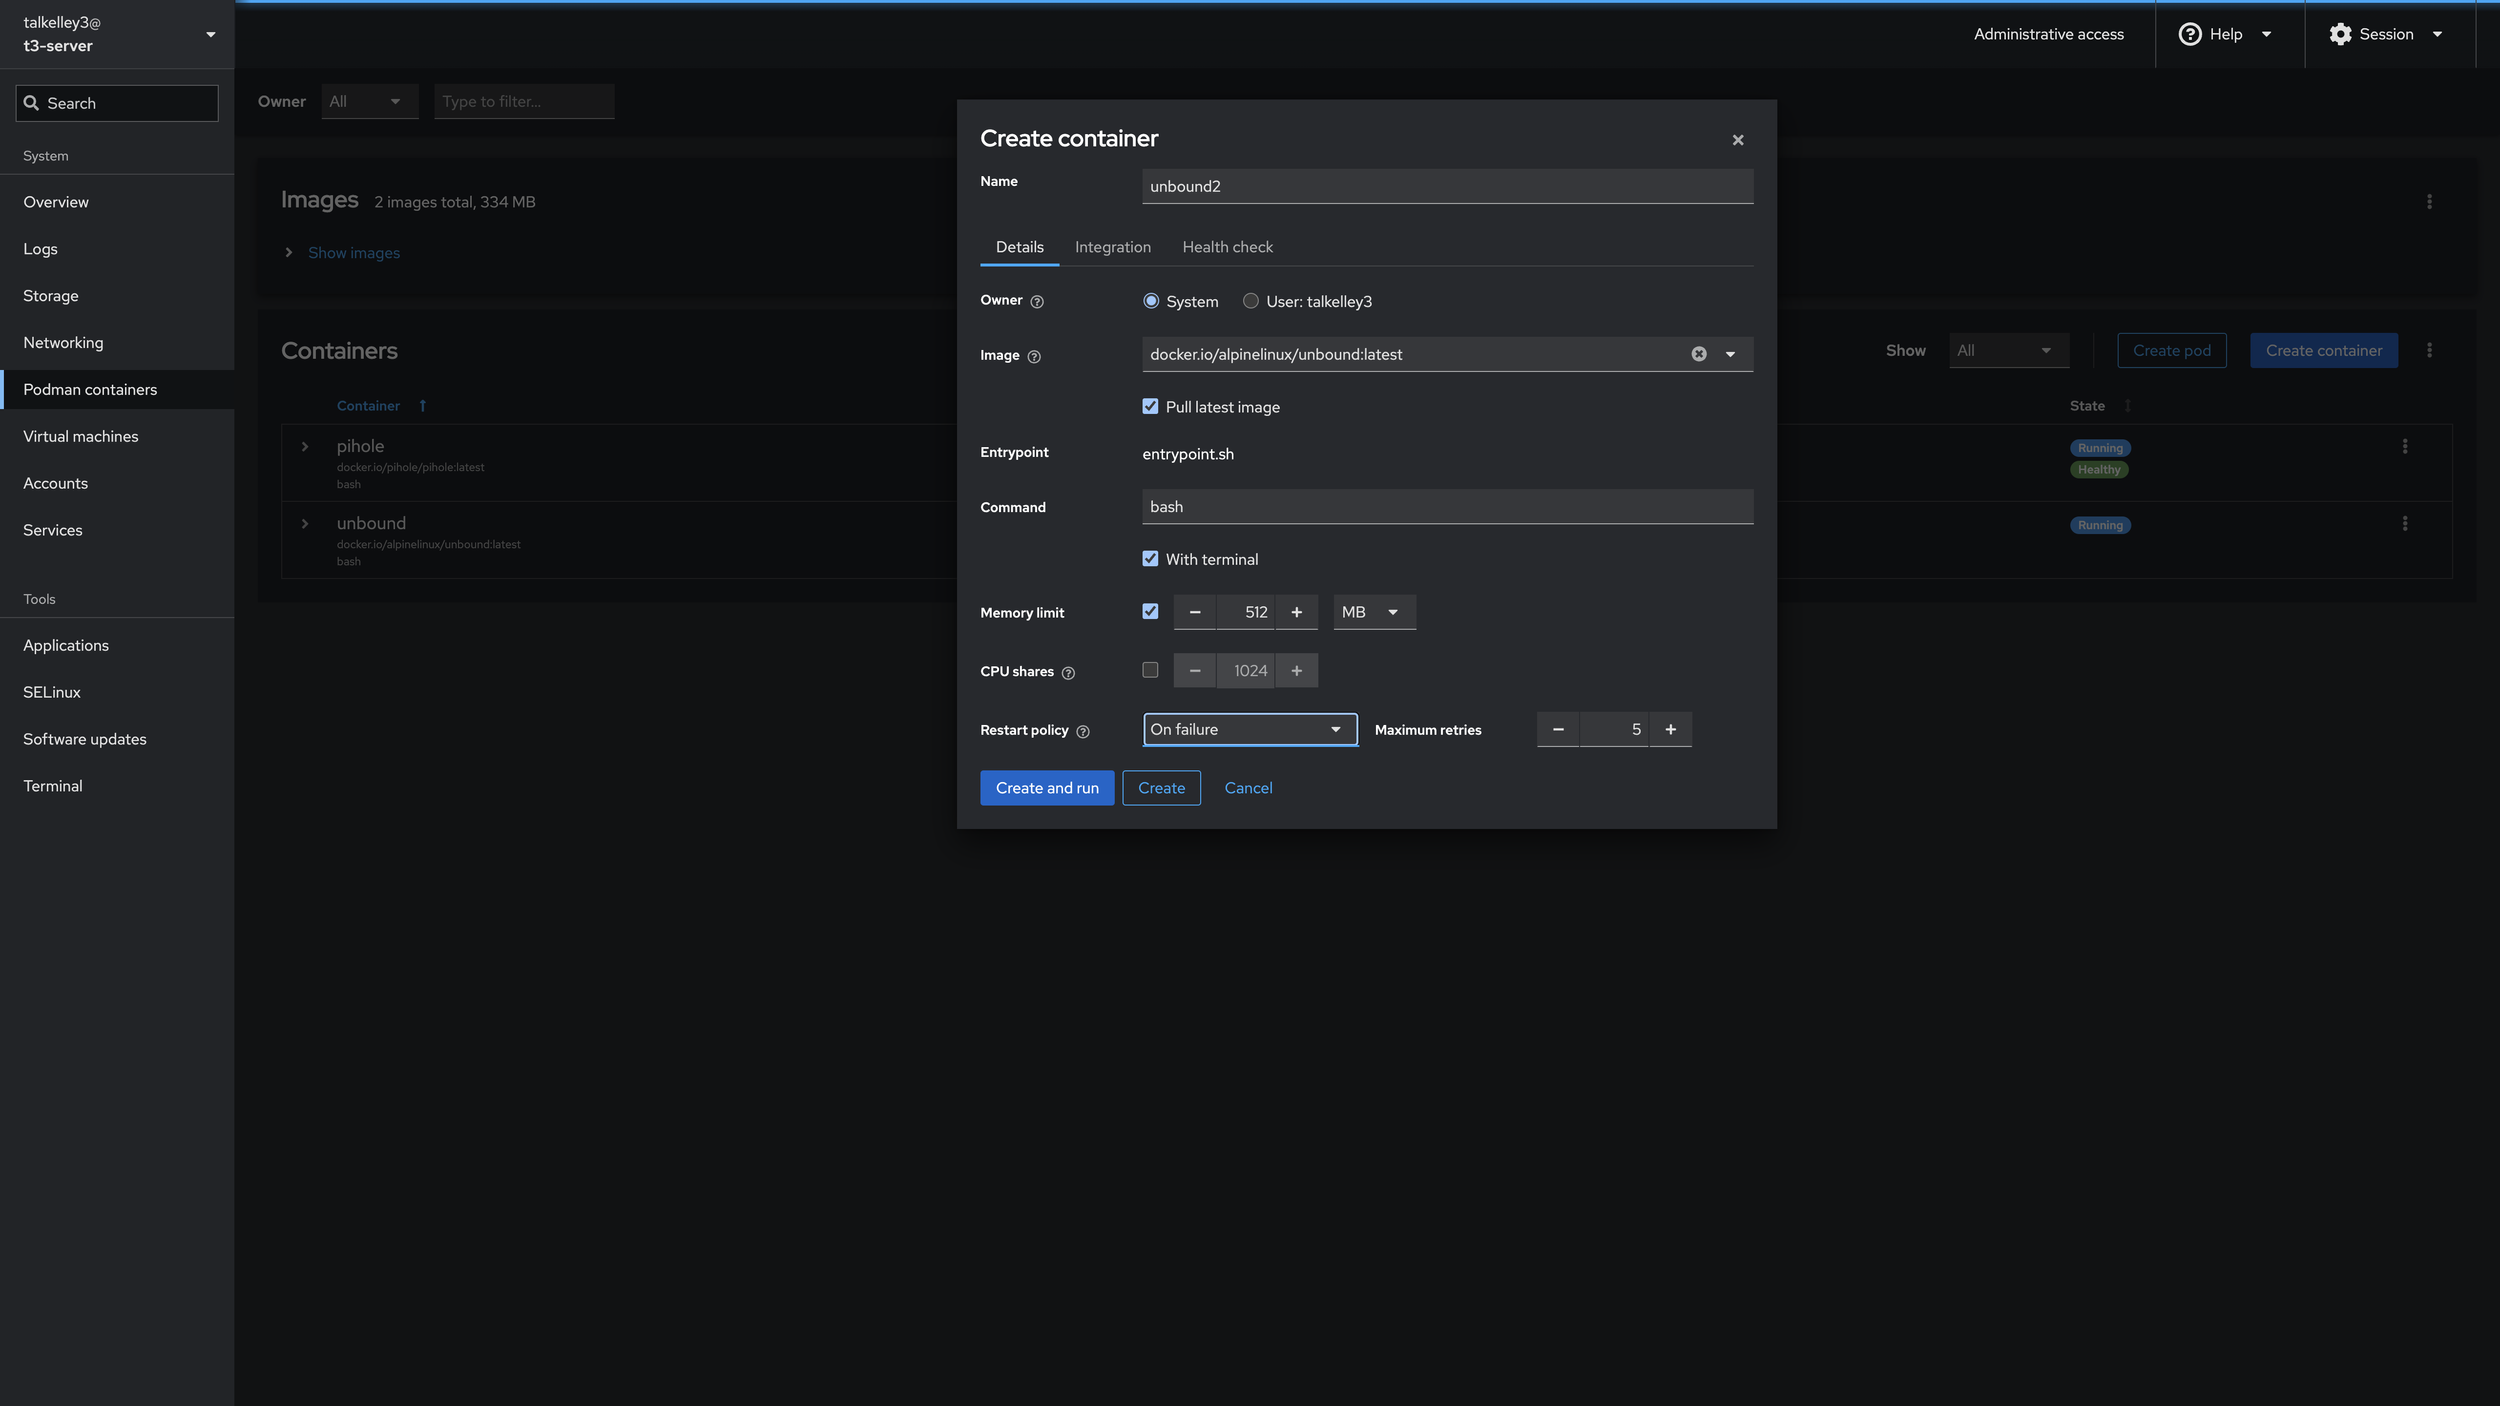
We’ll name this: unbound The Owner is System, and for Image we’ll search for “unbound” and choose the latest docker.io/alpinelinux/unbound:latest image. In Command we’ll put “bash”, check With terminal and keep the Memory Limit to 512 MB. Restart Policy we’ll set to “On failure.” And now we’re done with this page! Click Integration and we’ll fill out the next page.
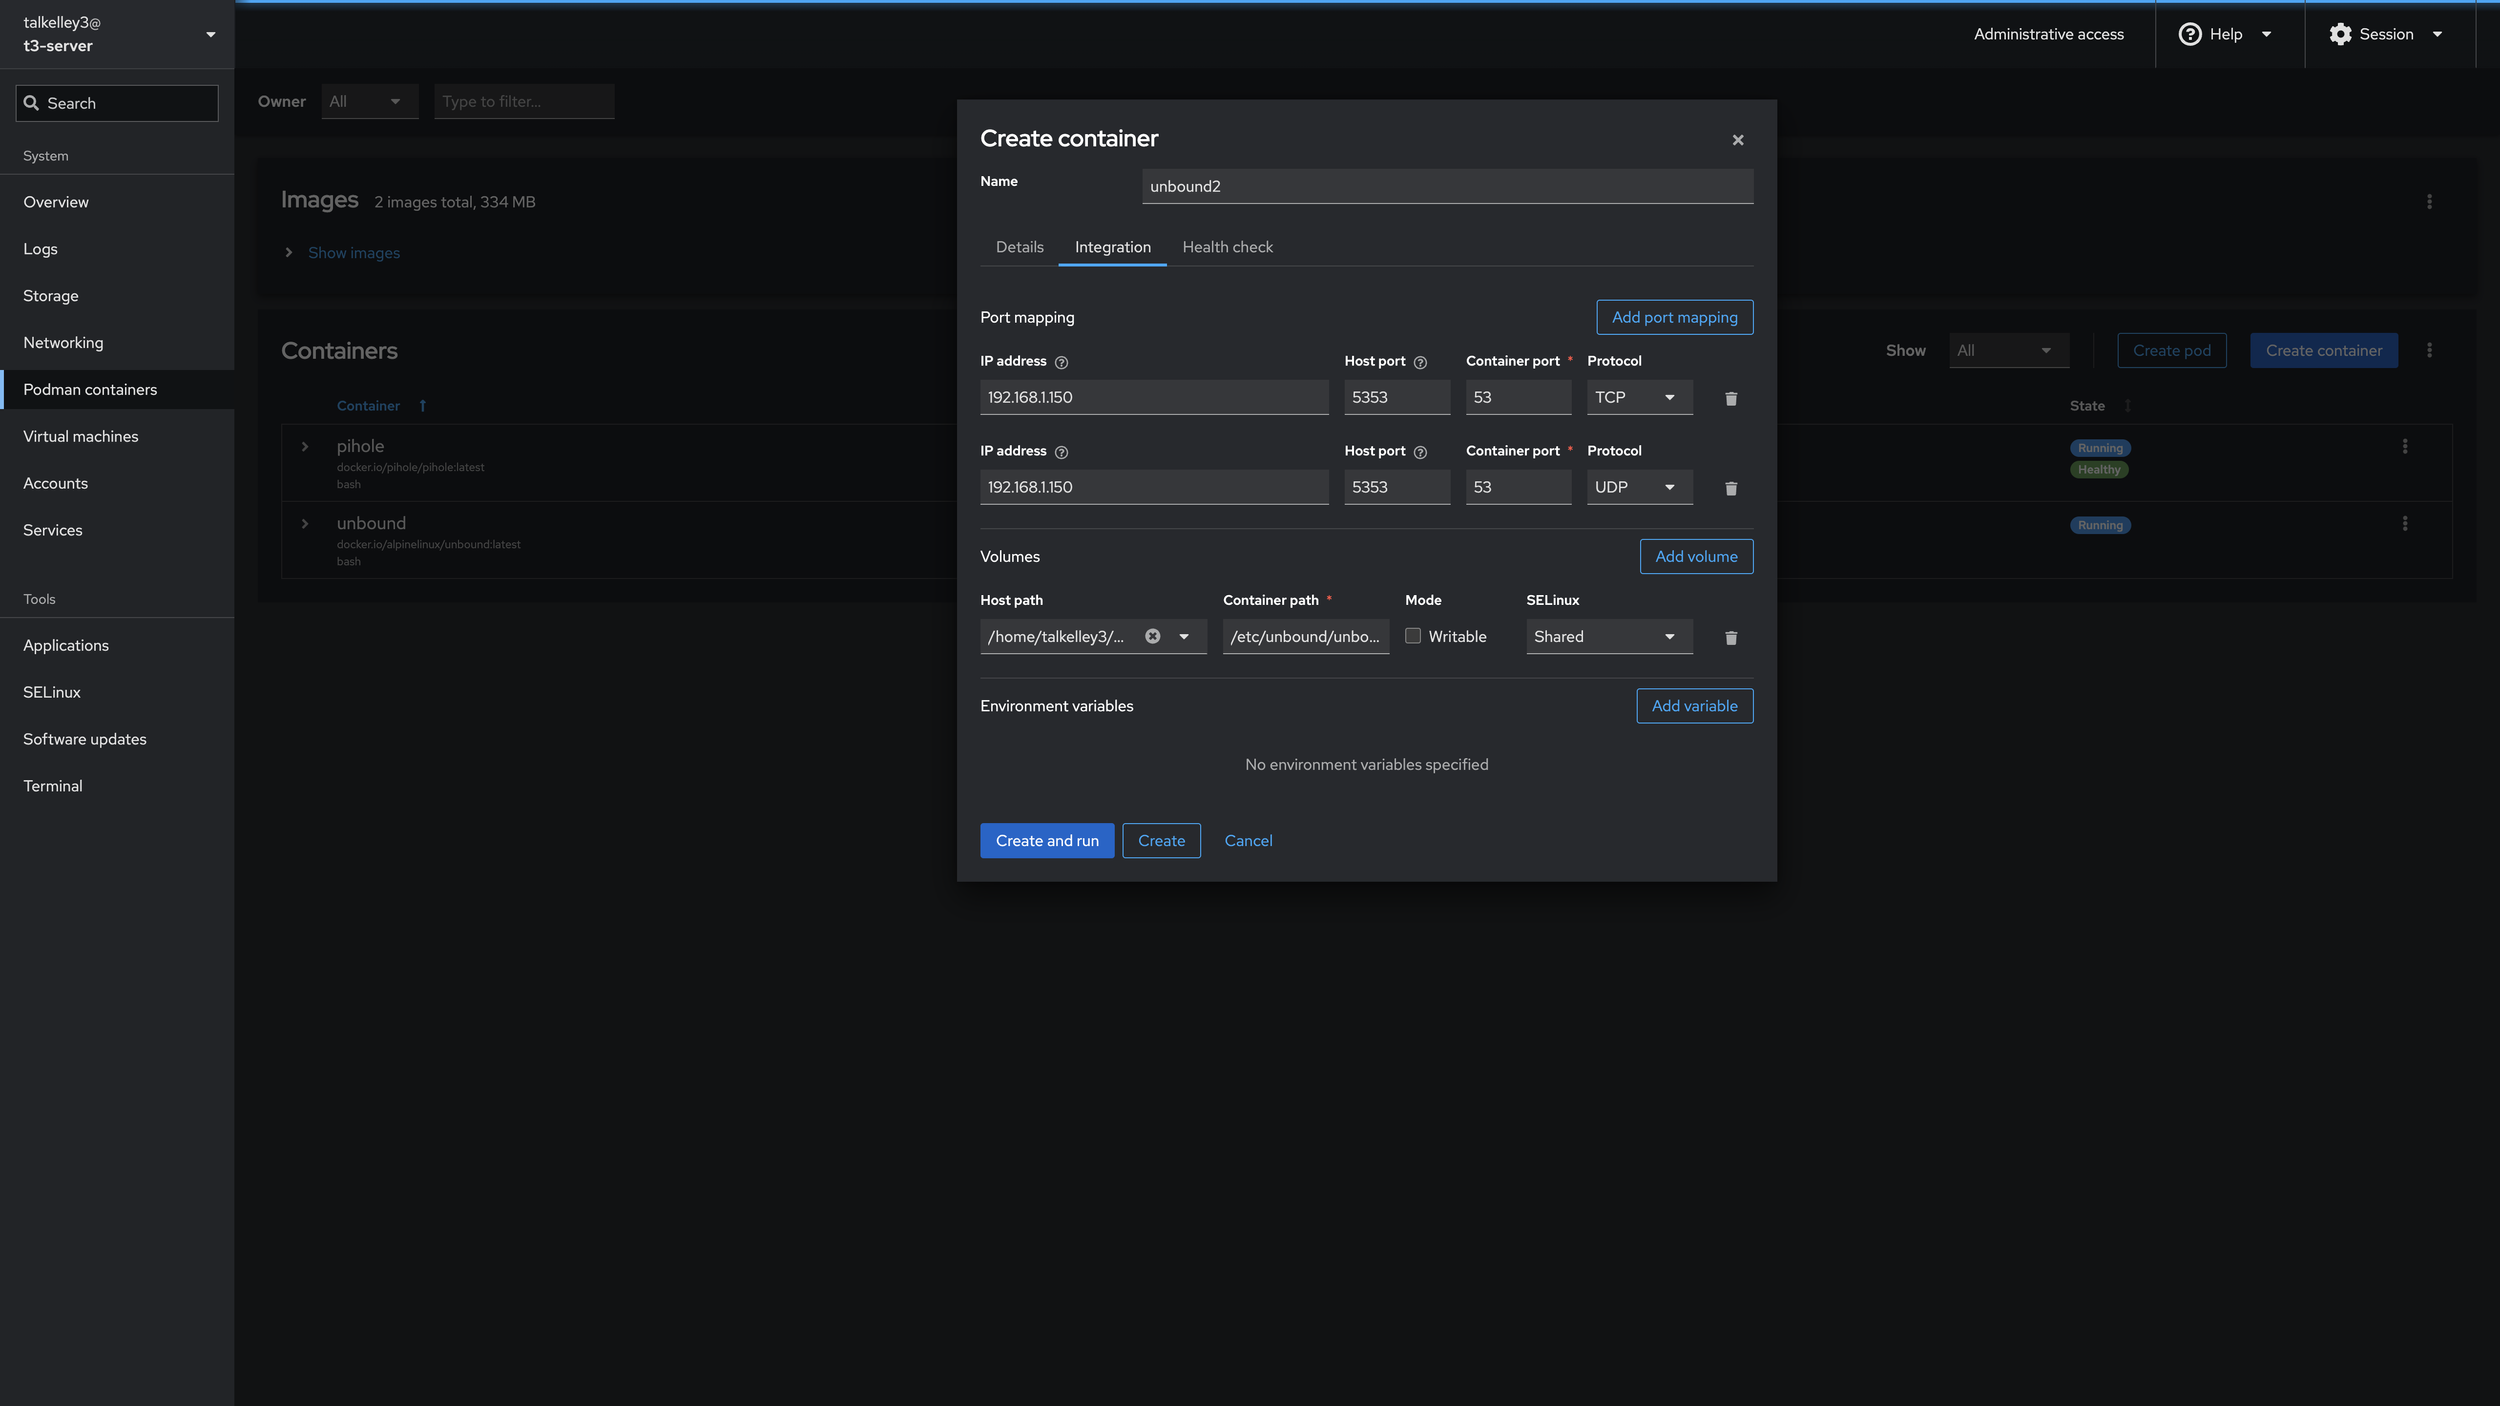
We want to map these ports from the internal container network, to our host so that PiHole can see them. We’ll configure those as
IP ADDRESS: 192.168.1.150
HOST PORT: 5353
CONTAINER PORT: 5353
PROTOCOL: TCP

IP ADDRESS: 192.168.1.150
HOST PORT: 5353
CONTAINER PORT: 5353
PROTOCOL: UDP
For volumes we’ll configure Unbound to have access to the config file we created earlier. Host Path maps to the folder we created earlier, while Container Path maps to those same folders location inside the container operating system. Replace my username in your path with yours
HOST PATH: /home/talkelley3/podman/unbound/unbound.conf
CONTAINER PATH: /etc/unbound
MODE: Read-Only
SELINUX: Shared
Go ahead and click Create and Run! Now you should see a successful status in the Podman container dashboard. Navigate to your PiHole server and we’ll connect both of them now. Uncheck the upstream DNS servers and set the “Custom 1” Upstream DNS server to your Unbound server IP#5353.
192.168.1.150#5353This points PiHole to our Unbound server, and enables us to use recursive DNS queries for PiHole!
What is DNS and Why Should it be Recursive?
DNS is also known as “Domain Name System.” All websites or hosts/servers are named with IP addresses which are sets of 3 numbers divided in 4 sections ranging from 0.0.0.0 – 255.255.255.255. Certain ranges are blocked off for internal network use, but the rest are owned by various companies to host websites on! DNS is a protocol / system that was developed to make the internet easier for us mere mortals to navigate! It translates website names to IP addresses on the backend. For example pi-hole.net is hosted at the IP 3.18.136.52 and DNS connects those two! If you open your command prompt on windows or terminal on macos and run “nslookup pi-hole.net” you can see the IP address behind the site! For us, when we visit pi-hole.net on our computer, the PiHole DNS server we set up will check first if that URL is stored in it’s block list or cache. If so then it will quickly either return a message of it being blocked or it’s IP address for faster website loading capabilities. If not then it’ll ask Google’s DNS servers for example, “who is pi-hole.net?”. Google will tell PiHole then PiHole will tell us and store that value for later. The downside is that then Google knows what website we went to, and for privacy that’s not super cool. Unbound DNS is a Recursive DNS Server. Since we’ve set that up, our PiHole server now asks Unbound, “who is pi-hole.net?”. Unbound then sends a request to the root DNS servers asking, “Who manages the .net domains?” Those root servers tell Unbound to reach out to the correct TLD (Top Level Domain) server next. Unbound reaches out and says .net who is handling the requests for pi-hole.net? The TLD server will say, “This is the authoritative server for pi-hole.net”, a.k.a. “This is who can tell us for sure what IP pi-hole.net is hosted on.” Finally Unbound reaches out to that server and says, “Authoritative server, who is pi-hole.net?” The server responds with the IP, which is then forwarded to PiHole to be cached, then on to us to view the site. The upside to this approach is no one DNS server has your full query path. The downside is occasionally it can be a bit slower, but personally I’ve not had a single issue with it so far!
Telling Our Network to use the PiHole DNS Server!
Now log into your router. It’s probably either hosted at hxxps://192.168.1.1 or hxxps://192.168.1.254 If you haven’t set it on your own the password is probably on the back of the router or modem your Internet Provider gave you. I’m on a TP-Link router, and navigated to my DHCP server settings, where I set my “Primary DNS” server to our server, 192.168.1.150. Now the process is complete!
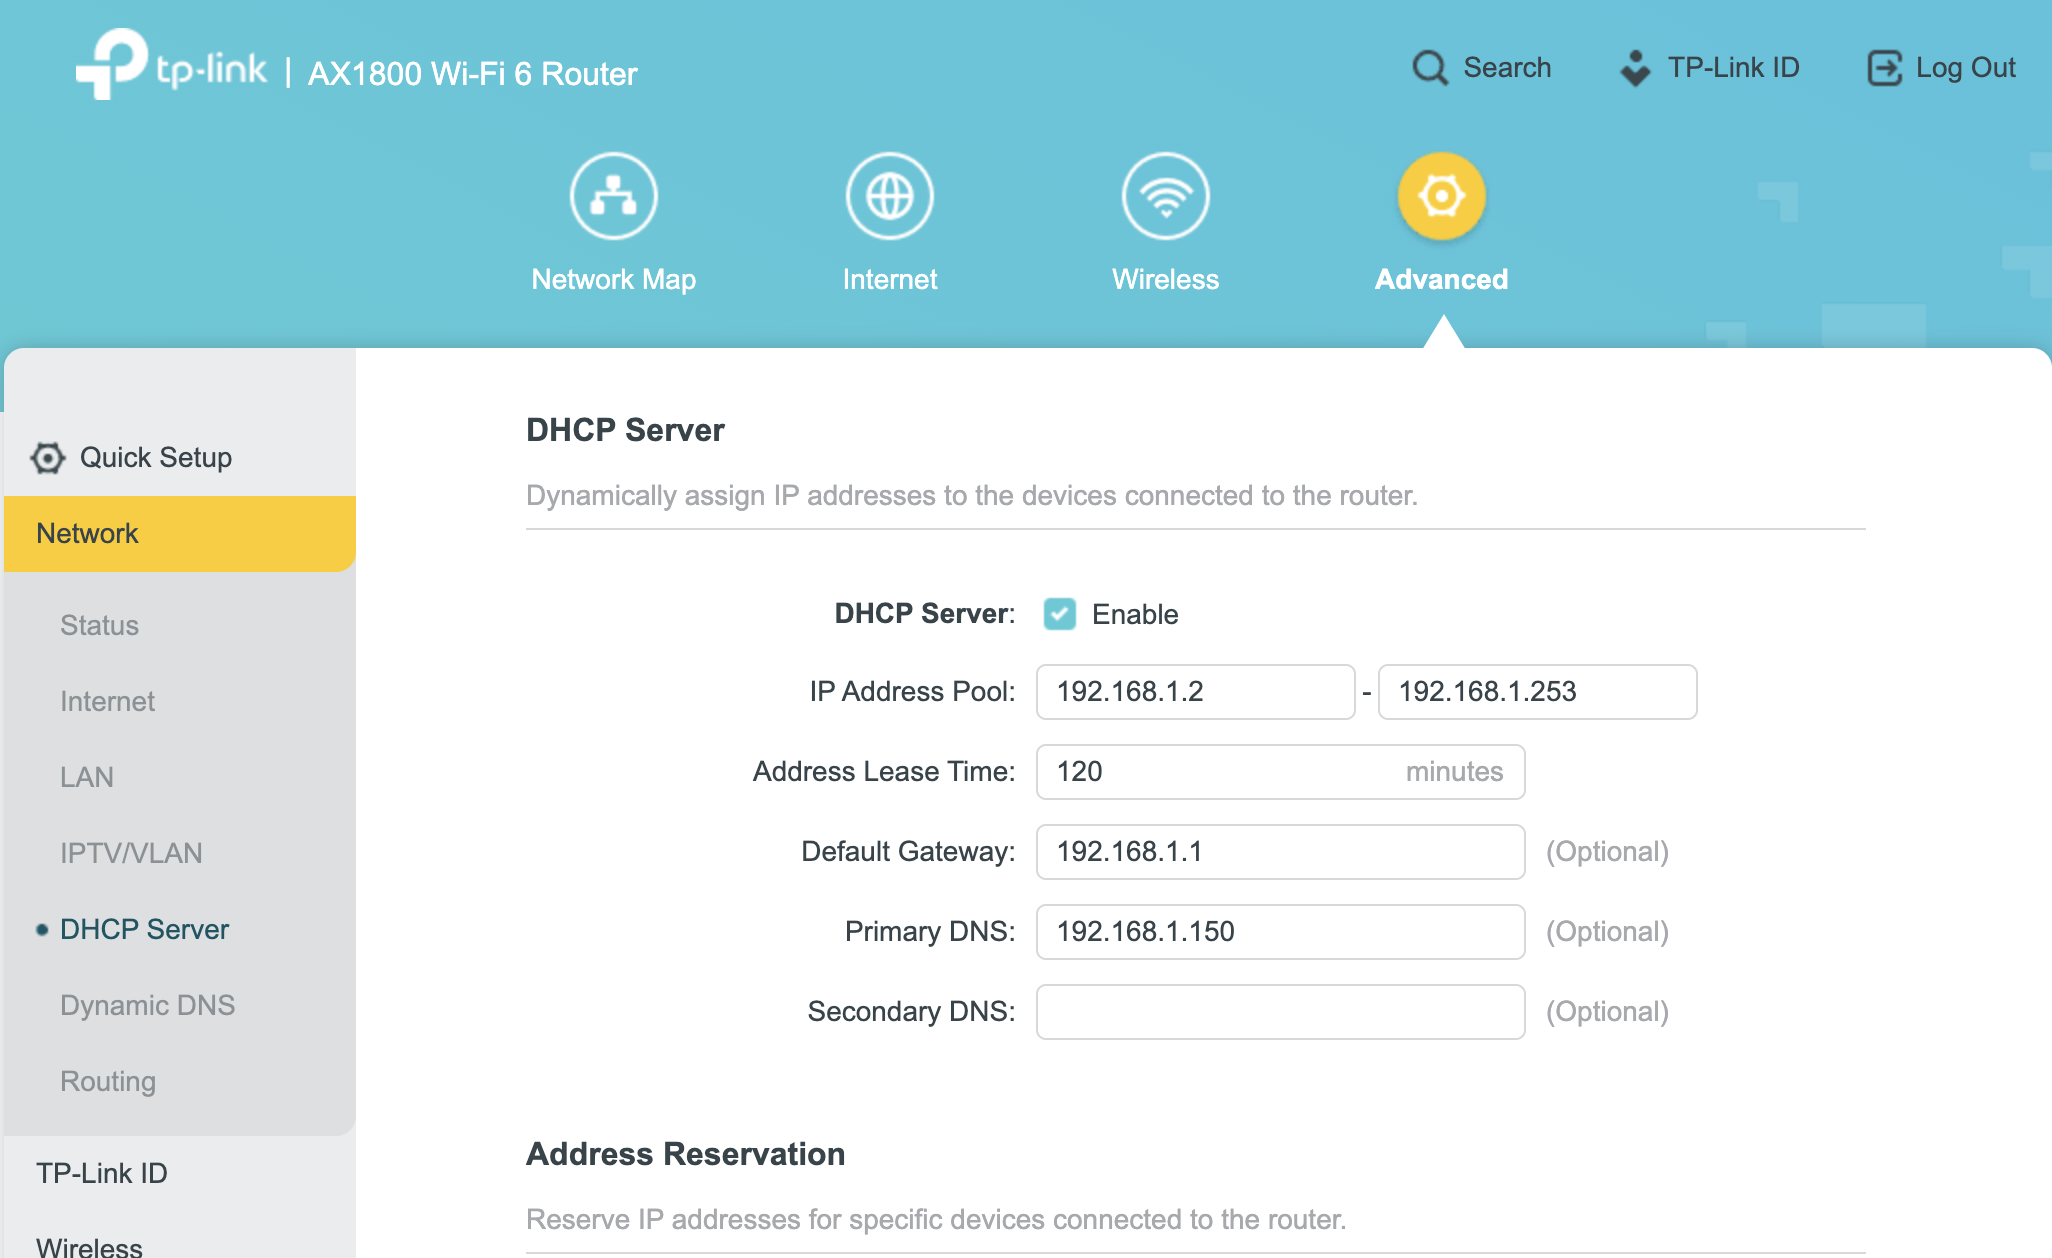
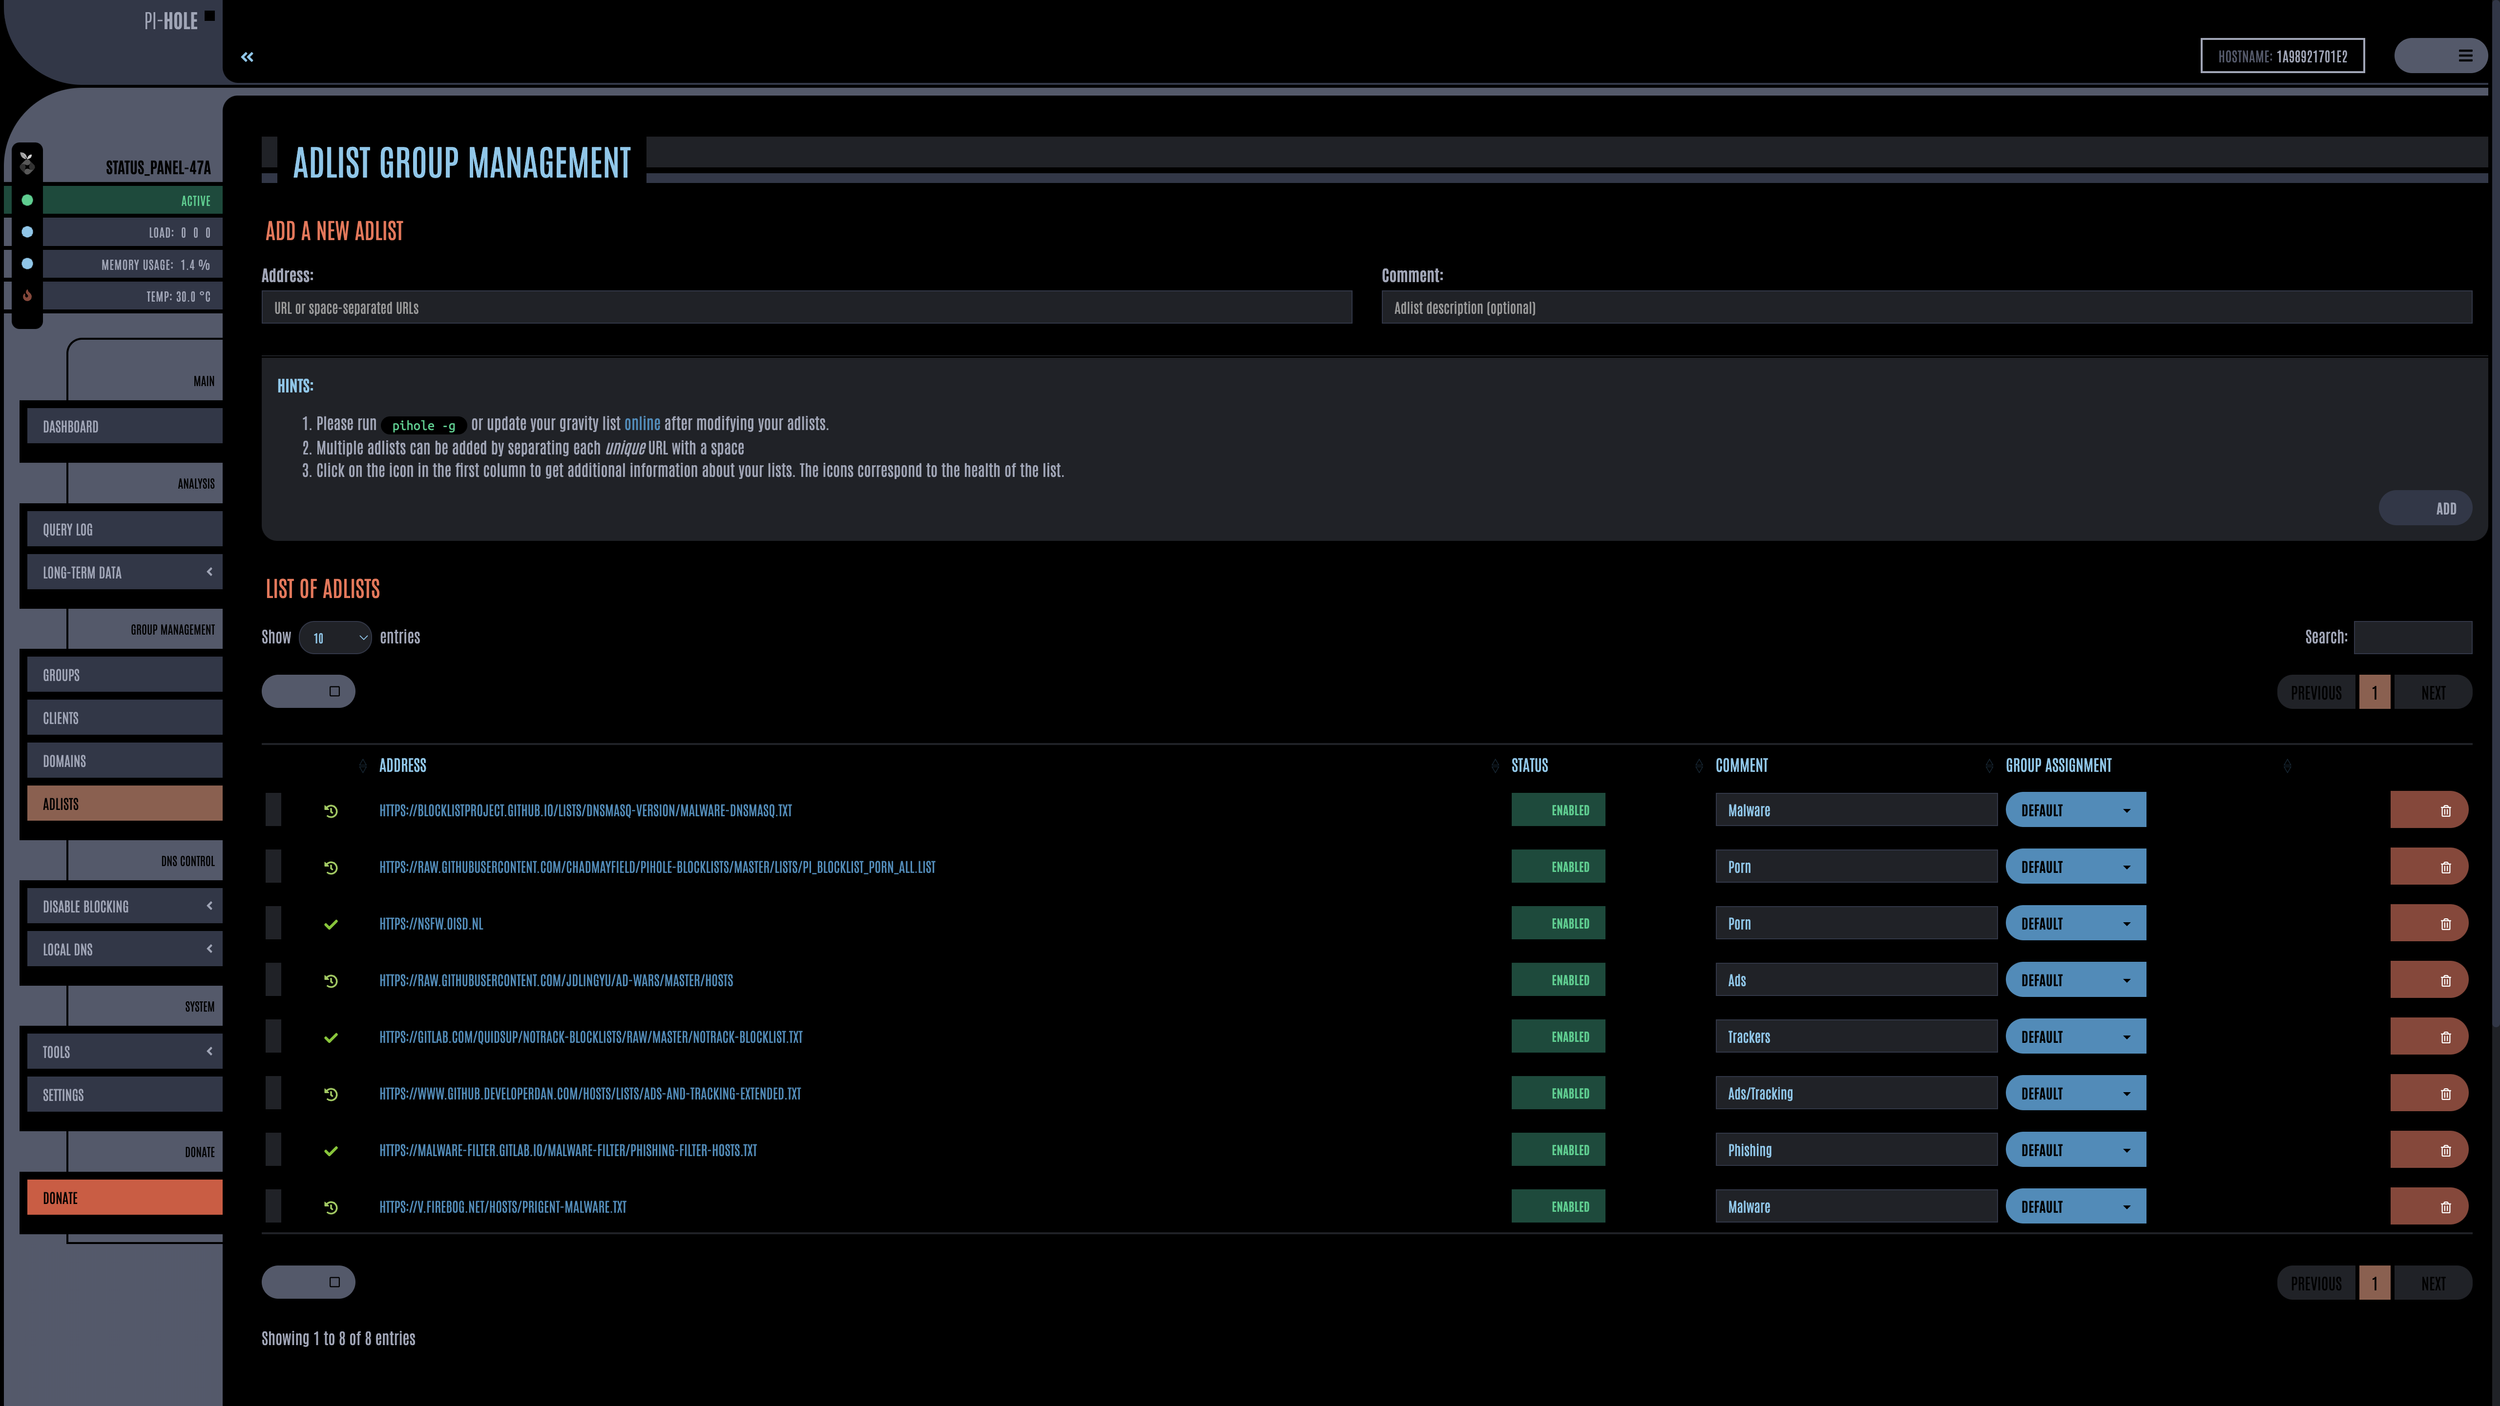
All of our devices are now using the PiHole DNS server once they renew their DHCP lease! Exciting! A flagship feature of PiHole is it’s ad-blocking capabilities. I use it to block various malware, phishing, ads / tracker, and porn URL’s, as I’m not interested in any of those particular things lol. I’ll include a list of all the ones I use now, which you can just paste into this field! Paste the URL into “Add A New Adlist”, and put a comment as to what it’s for, then click Add.
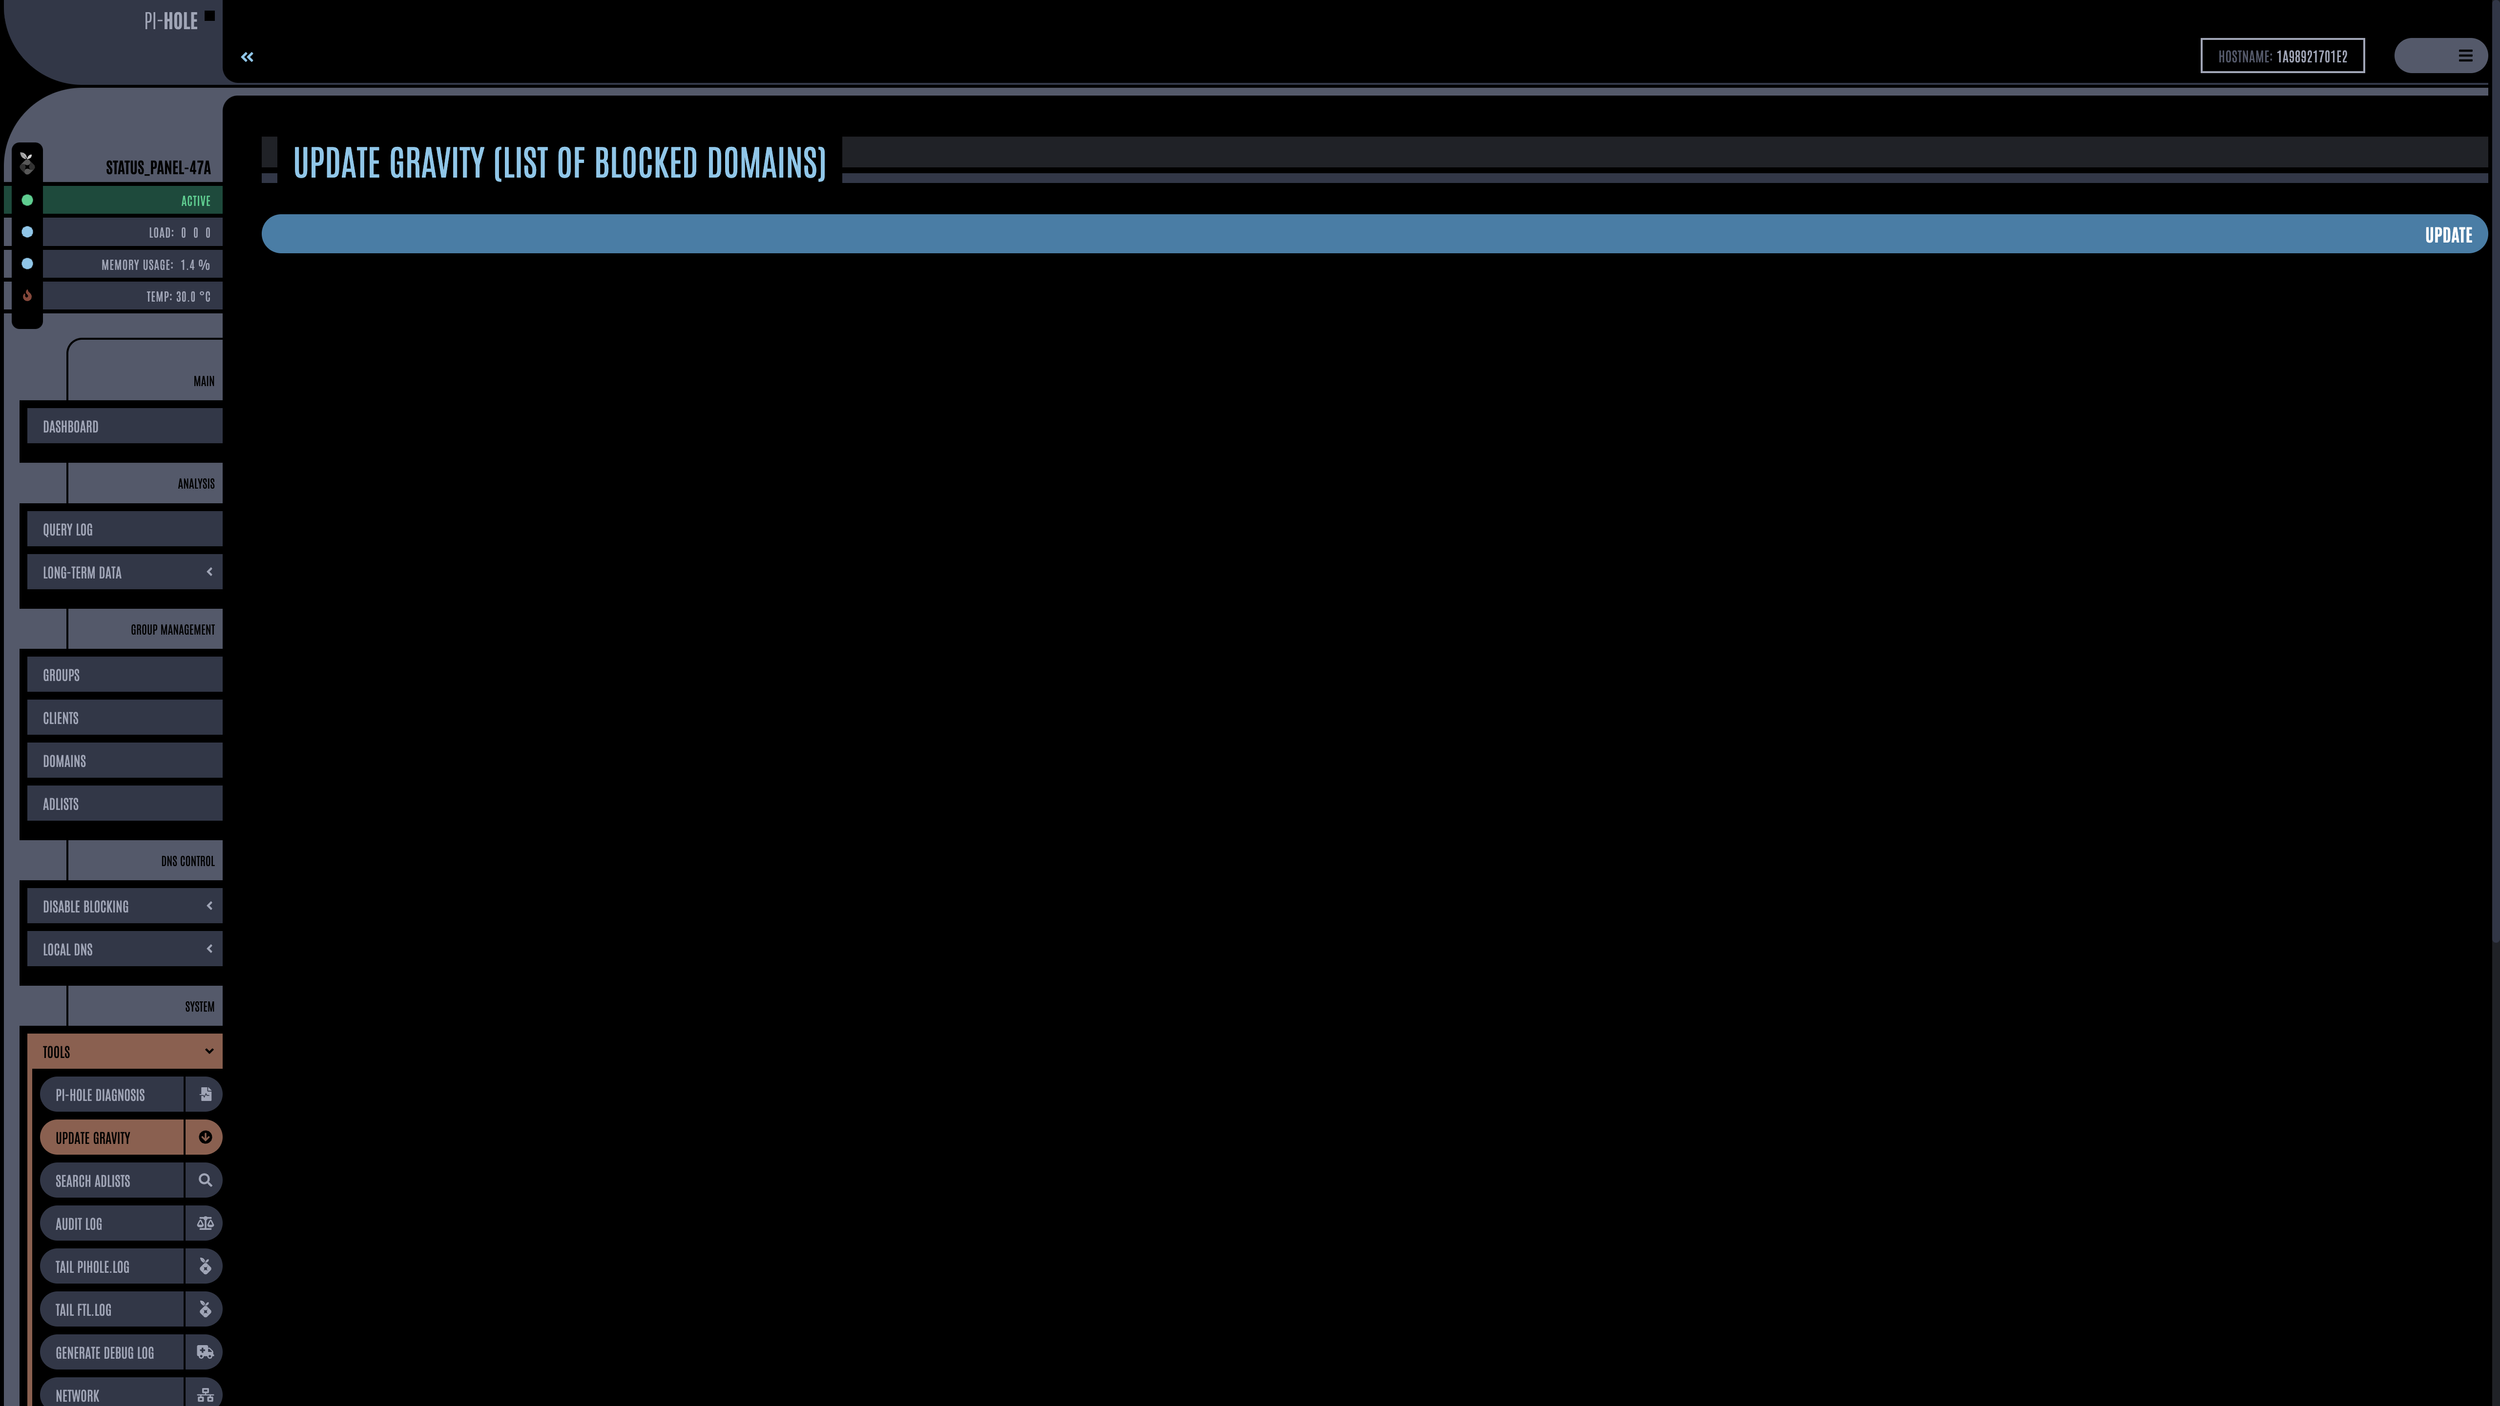
After you’re done open the Tools menu and click “Update Gravity” then “Update”. Now your dashboard will start looking more like mine, with lots of blocks and your web browsing experience will be ad free!
My AdLists (Block List)
- MALWARE: HTTPS://BLOCKLISTPROJECT.GITHUB.IO/LISTS/DNSMASQ-VERSION/MALWARE-DNSMASQ.TXT
- MALWARE: HTTPS://V.FIREBOG.NET/HOSTS/PRIGENT-MALWARE.TXT
- PHISHING: HTTPS://MALWARE-FILTER.GITLAB.IO/MALWARE-FILTER/PHISHING-FILTER-HOSTS.TXT
- ADS: HTTPS://RAW.GITHUBUSERCONTENT.COM/JDLINGYU/AD-WARS/MASTER/HOSTS
- TRACKERS: HTTPS://GITLAB.COM/QUIDSUP/NOTRACK-BLOCKLISTS/RAW/MASTER/NOTRACK-BLOCKLIST.TXT
- ADS + TRACKERS: HTTPS://WWW.GITHUB.DEVELOPERDAN.COM/HOSTS/LISTS/ADS-AND-TRACKING-EXTENDED.TXT
- PORN: HTTPS://RAW.GITHUBUSERCONTENT.COM/CHADMAYFIELD/PIHOLE-BLOCKLISTS/MASTER/LISTS/PI_BLOCKLIST_PORN_ALL.LIST
- PORN: HTTPS://NSFW.OISD.NL
I hope you enjoyed this blog post on how to install PiHole and Unbound on Fedora Linux! Let me know if there are any more topics you wish for me to cover on here or my YouTube channel!

Leave a Reply